

Dashboard
The Job Book home screen: every card and where it goes, the Navigate and Settings menus, what each role sees, the Actions required banner, and setting up your signature.
Key Concepts
The dashboard is where Job Book puts you when you sign in, and it is where the rest of this manual starts from: most instructions here begin “On the dashboard, in the X card, click Y.” For daily work, most staff won’t need the Navigate or Settings menus. If Job Book itself is new to you, the Overview says what it is for before this page says where things are.
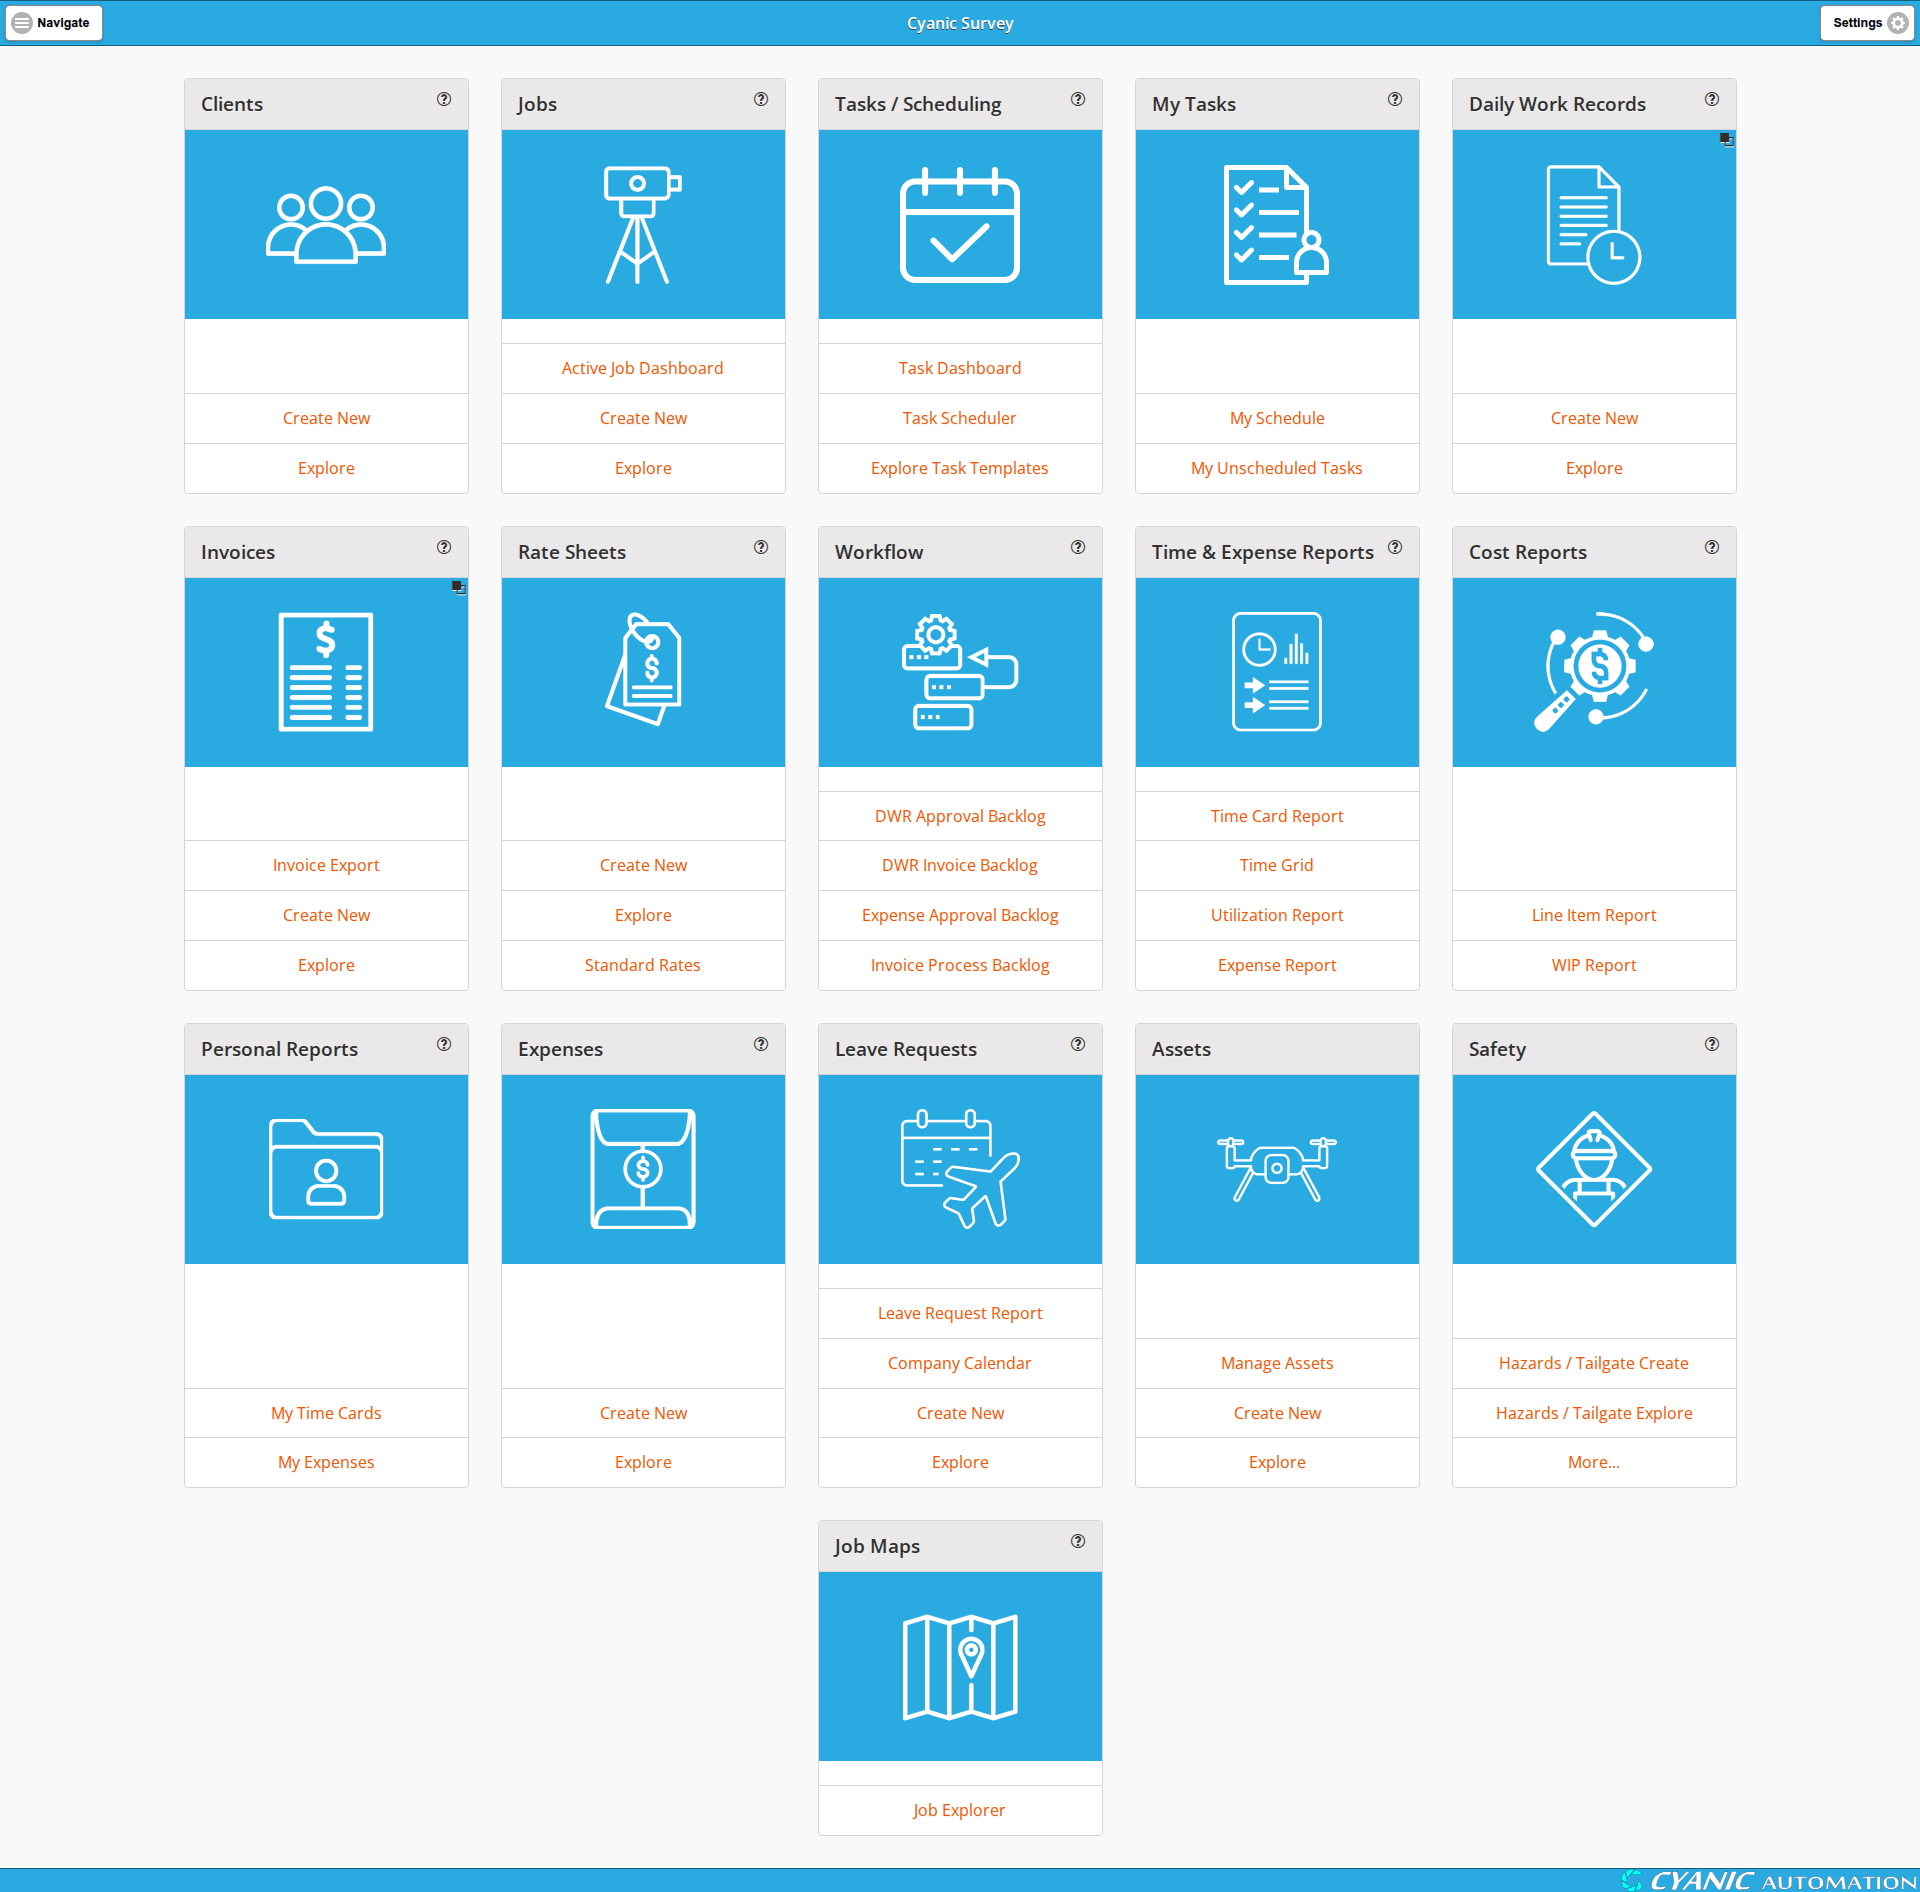
The blue bar across the top is the same on every screen in Job Book:
- Navigate, in the top-left corner, opens a menu panel down the left side of the page. It holds groups of screens the cards do not show.
- Your company’s name in the middle.
- Settings, in the top-right corner with a gear icon, opens your account menu.
Below the bar is a grid of cards, five across on a wide screen. Each card is one area of the app, and every card is built the same way:
- A grey title bar with the card’s name, and a ? icon at its right. Hovering the ? shows a one-line description of the card.
- A blue panel with a line-art icon.
- One to four text links, in orange.
Two of those links come up over and over. Explore opens the list of records already saved, and Create New opens a blank form for adding one. Clients, Jobs, Daily Work Records, Invoices, Rate Sheets, Expenses, Leave Requests and Assets all carry the pair. Any report or utility the card offers sits above them, except on Rate Sheets, where Standard Rates sits below.
Depending on the modules your company has and the permissions you have been given, you might see fewer cards than the picture above shows. Tasks / Scheduling, Leave Requests, Assets and Safety are separate modules, and the card for one your company has not licensed is not there. Roles are the other half of it, and they are covered in What each role sees.
The cards
The cards, in the order they appear on an Administrator’s dashboard, reading left to right along each row. The middle column is the sentence the card’s ? icon shows.
| Card | What it is for | Links |
|---|---|---|
| Clients | Manage your clients, contacts and office locations. | Create New, Explore |
| Jobs | Set-up new jobs and search for existing jobs. | Active Job Dashboard, Create New, Explore |
| Tasks / Scheduling | Task planning and scheduling for jobs | Task Dashboard, Task Scheduler, Explore Task Templates |
| My Tasks | See the scheduled and unscheduled tasks for the current employee. | My Schedule, My Unscheduled Tasks |
| Daily Work Records | Fill in timesheets and equipment / material costs for a job. | Create New, Explore |
| Invoices | Convert daily work records into invoices to bill your clients. | Invoice Export, Create New, Explore |
| Rate Sheets | Create re-usable line-item templates that can be applied to clients and jobs. | Create New, Explore, Standard Rates |
| Workflow | Batch management for approving and invoicing daily work records. | DWR Approval Backlog, DWR Invoice Backlog, Expense Approval Backlog, Invoice Process Backlog |
| Time & Expense Reports | Report on employee time and expenses against jobs. | Time Card Report, Time Grid, Utilization Report, Expense Report |
| Cost Reports | Detailed line item reporting against jobs. | Line Item Report, WIP Report |
| Personal Reports | See status of timesheets and expenses for the current employee. | My Time Cards, My Expenses |
| Expenses | Fill in expenses against jobs. | Create New, Explore |
| Leave Requests | Submit leave requests for approval. | Leave Request Report, Company Calendar, Create New, Explore |
| Assets | Manage your company’s assets and even assign ownership to employees. | Manage Assets, Create New, Explore |
| Safety | Navigate to the safety dashboard. | Hazards / Tailgate Create, Hazards / Tailgate Explore, More… |
| Job Maps | Advanced geospatial view of all past and current jobs. | Job Explorer |
Most of the link names explain themselves. These are the ones worth spelling out, in card order:
- Active Job Dashboard: view all your active jobs.
- Invoice Export: export your invoices to Excel.
- Standard Rates: the default price on every Labour and every Equipment and Materials item.
- DWR Approval Backlog: review and approve timesheets.
- DWR Invoice Backlog: convert approved DWRs on Time & Materials jobs into invoices.
- Expense Approval Backlog: review and approve expenses.
- Invoice Process Backlog: export finalized invoices into your accounting system.
- Time Card Report: shows labour hours and can be exported to Excel for payroll.
- Time Grid: totals hours per employee.
- Utilization Report: shows utilization, chargeability and effective rate of your staff.
- Expense Report: lists all expenses and their status.
- Line Item Report: the line items used on each job and their amounts.
- WIP Report: a work in progress report showing all your in-flight work, and what has and has not been invoiced.
- More…: opens the safety dashboard, which carries a card for each of the safety module’s forms. The Safety card on the dashboard itself only offers the hazard assessment and tailgate meeting form.
- Job Explorer: see all jobs in the system on a geospatial map, where you can search and filter past jobs.
What each role sees
Every user has at least one role, and your roles decide which cards you get and which links are on them. A user with two roles gets the cards of both.
| Role | Cards on the dashboard |
|---|---|
| Administrator | Every card. |
| Manager | Every card, with fewer links on Clients, Jobs and Rate Sheets. |
| Job Coordinator | Clients, Jobs, My Tasks, Daily Work Records, Rate Sheets, Personal Reports, Expenses, Leave Requests, Assets and Job Maps. |
| Technician | My Tasks, Daily Work Records, Personal Reports, Expenses, Leave Requests, Assets and Safety. |
Safety is the one card a Technician gets that a Job Coordinator does not.
Job Coordinator is usually added to another role. Technician and Job Coordinator gives the Technician’s cards plus Clients, Jobs, Rate Sheets and Job Maps. Manager and Job Coordinator gives every card, with Create New on the Clients and Jobs cards.
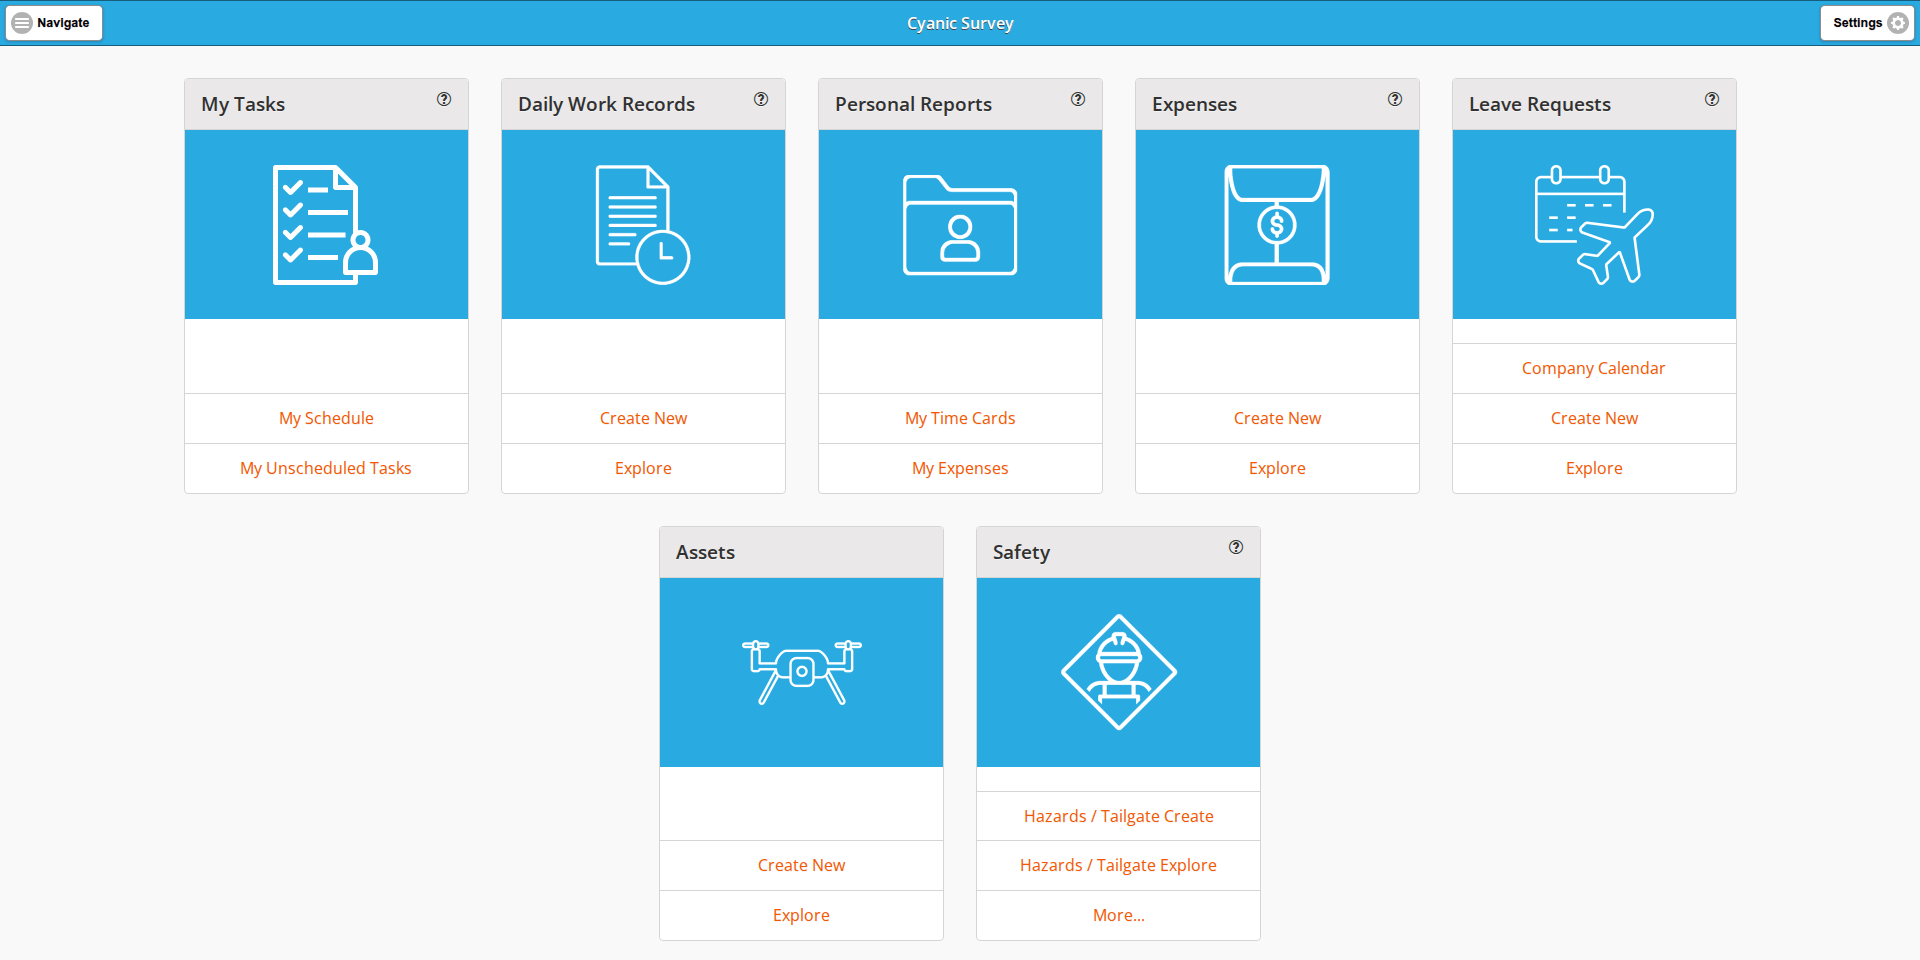
A Manager’s dashboard has the same cards as an Administrator’s. Where a role gets a card, it does not always get every link on it:
- On a Manager’s dashboard the Clients card offers Explore and nothing else. Managers can look clients up but cannot create or edit them.
- The Manager’s Jobs card offers Active Job Dashboard and Explore, with no Create New. A Job Coordinator’s Clients and Jobs cards both keep Create New.
- Only an Administrator’s Rate Sheets card has Create New. A Manager’s and a Job Coordinator’s shows Explore and Standard Rates only.
- The Manager’s Invoices card does keep Create New.
- On a Job Coordinator’s and a Technician’s dashboard, the Leave Requests card shows Company Calendar, Create New and Explore, without the Leave Request Report. A Technician’s Assets card shows Create New and Explore, without Manage Assets. A Job Coordinator’s shows Explore only, because assets are read-only for that role.
Which role a user has is set on their user account, and role membership is managed from Settings, then Roles. See Users and Employee Profiles.
Performing Common Tasks
Opening a screen from a card
The card names in this manual’s instructions are the ones in the table above. To come back to the dashboard from any screen, click Navigate, then Home.
Using the Navigate menu
Navigate, in the top-left corner, opens a panel down the left side of the page. Home sits at the top of it, with the screens grouped below. The groups start collapsed; click a group’s name to open it, and click it again to close it.
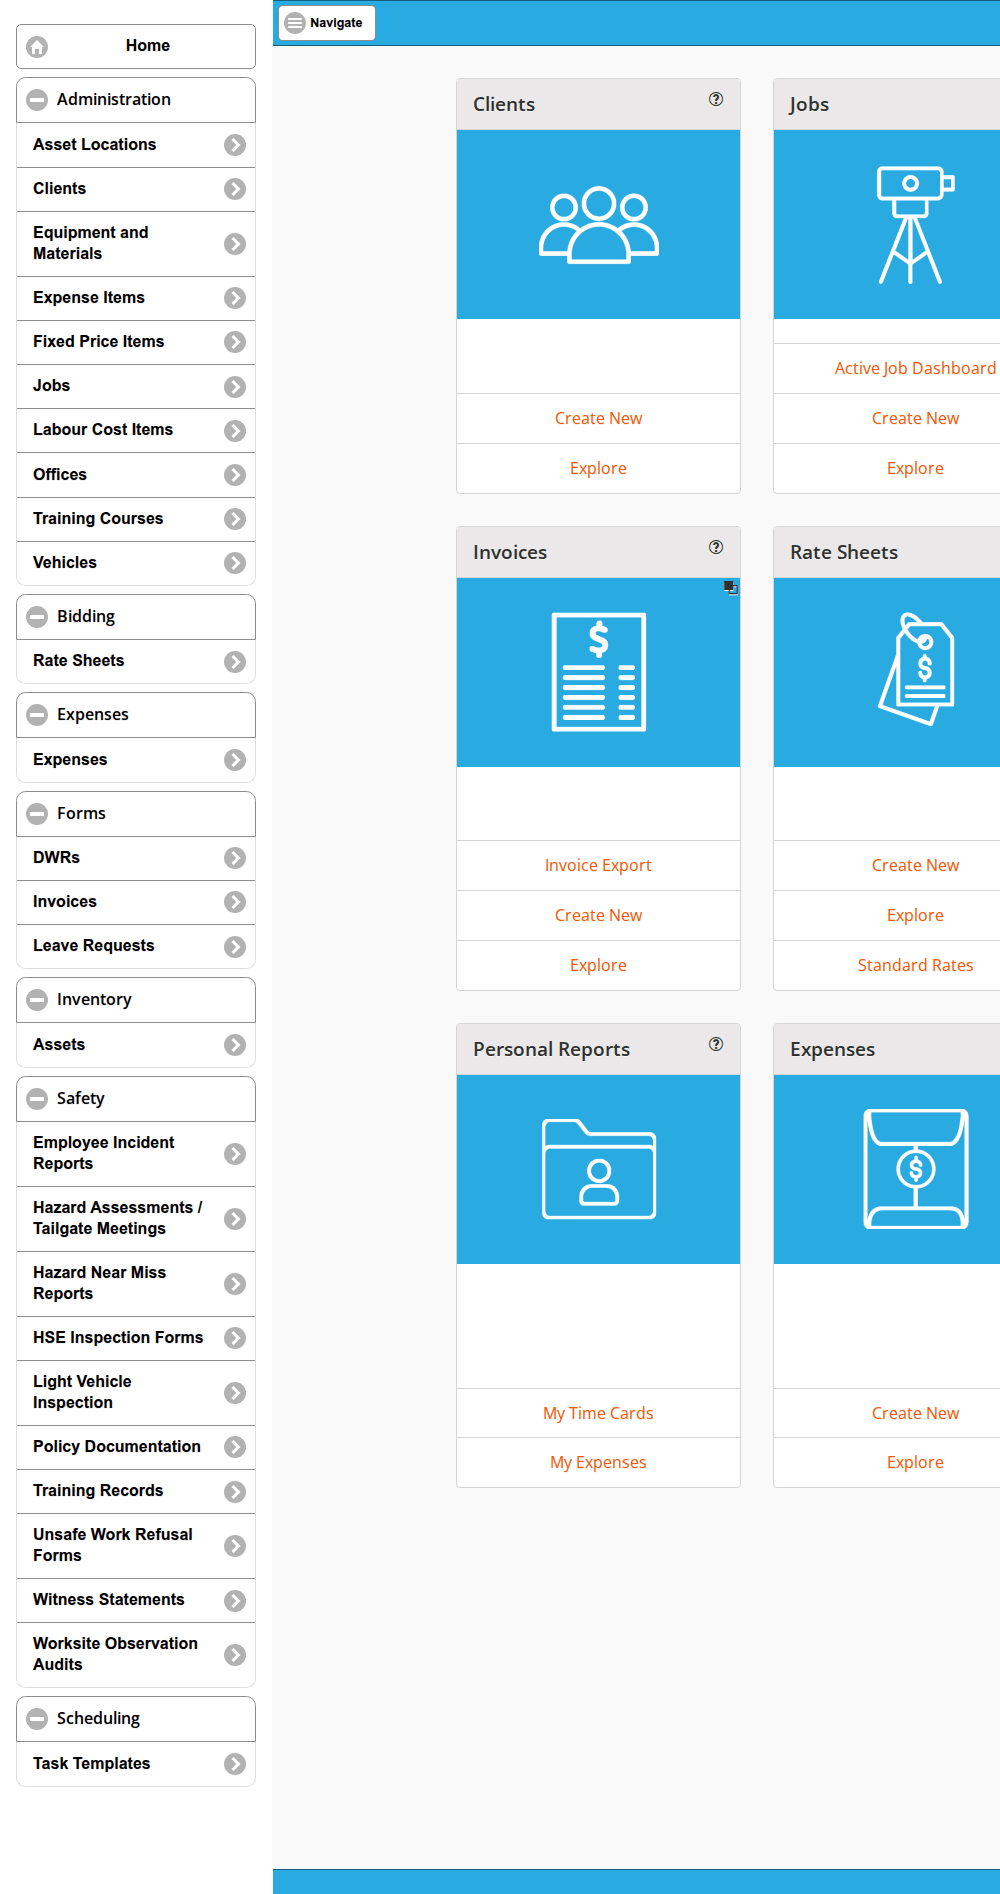
- Administration: Asset Locations, Clients, Equipment and Materials, Expense Items, Fixed Price Items, Jobs, Labour Cost Items, Offices, Training Courses and Vehicles. Most of these are the lists an Administrator sets up once; see Administration Settings.
- Bidding: Rate Sheets.
- Expenses: Expenses.
- Forms: DWRs, Invoices and Leave Requests.
- Inventory: Assets.
- Safety: Employee Incident Reports, Hazard Assessments / Tailgate Meetings, Hazard Near Miss Reports, HSE Inspection Forms, Light Vehicle Inspection, Policy Documentation, Training Records, Unsafe Work Refusal Forms, Witness Statements and Worksite Observation Audits.
- Scheduling: Task Templates.
This is where the menu earns its place: most of the Administration lists have no dashboard card at all (only Clients and Jobs do), and the Safety group holds ten form types where the Safety card offers one.
Opening Settings
Settings, in the top-right corner with the gear icon, opens a panel down the right side of the page. It is where you go when something about your own account has to change.
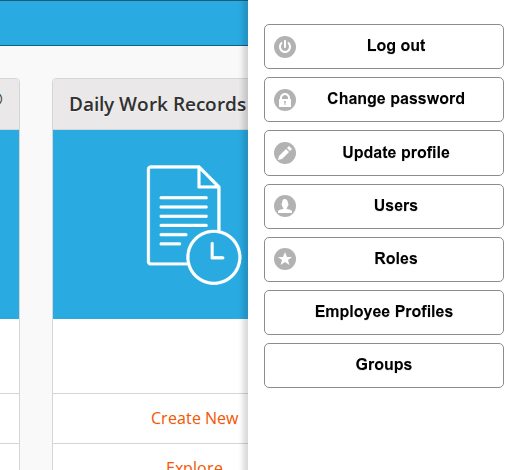
- Log out: ends your session and returns you to the sign-in page.
- Change password: changes the password on your account while you are signed in.
- Update profile: your name and an email-contact preference. This is a different screen from your employee profile, and it carries no signature, so it is not where a signature is set.
- Users: the login accounts. See Users and Employee Profiles.
- Roles: which users belong to Administrator, Manager, Job Coordinator and Technician.
- Employee Profiles: the employee records that jobs, timesheets and signatures attach to. Its My Profile view holds one record: your own.
- Groups: employee groups, which let you pick several employees at once elsewhere in the system, such as on the Task Scheduler.
Acting on “Actions required”
When something is waiting for you, a pale-blue banner appears between the top bar and the first row of cards, headed Actions required, with a bulleted list of links under it. Each line says how many records are waiting and what they are, and the line is a link to them.

- Read the line to see what is waiting. A leave request submitted to you for approval reads 1 Leave Request(s) awaiting my approval, with the count changing as requests come in.
- Click the line to open the records it names. Approving or rejecting a leave request is covered in Leave Requests.
- Leave requests are not the only thing that puts a line here; a signature not yet on file is another.
- The other pictures on this page show no banner because nothing was pending when they were taken.
Setting up your signature
If this is your first time in Job Book your signature is not set yet, and a blue notification bar sits across the top of the dashboard reading:
We do not have your signature on file. Click here to edit your profile and set up your signature, so you can automatically sign forms and save time.
Click the link in the bar. Recording the signature and saving it, and changing one later, is on Site Staff Initial Setup; once it is saved the notification bar is gone.
Video
Last updated