

Invoices
How an invoice moves from the PM Queue to Paid, what is on the invoice form and its tabs, and how Invoice Export puts invoice lines into Excel.
Key Concepts
The Invoices list is where jobs are billed. The figures on an invoice also feed the Active Job Dashboard. Every invoice sits at one stage of its life, and the saved views along the top of the list are those stages.
- The life of an invoice: PM Queue → Ticket Queue → Admin Queue → Processed → Paid. A new invoice starts in the PM Queue. Once it is signed off it moves either to the Ticket Queue, if the job was set to Ticket / Invoice, or straight to the Admin Queue. The Admin Queue is where invoices are processed. Once processed they move to Processed, and the final step is setting the invoice to Paid, which moves it to the Paid view.
- The stage views add up to All: the stage views hold every invoice between them, and the All view is the whole set. My Forms is a personal filter that shows the invoices you created, not a stage; an invoice appears there as well as in whichever stage it has reached.
- The Admin Queue and the Invoice Process Backlog are the same invoices: the Admin Queue view shows them one card at a time, and the backlog shows the same set as a grid for exporting and processing in batches. See Invoice Process Backlog.
- The invoice type comes from the job: whether an invoice passes through the Ticket Queue is decided by the job’s Invoice Type, which is either Invoice or Ticket / Invoice. See Job Setup.
- Who does what: a Manager sees the same layout as an Administrator and follows the same steps, creating invoices included.
Performing Common Tasks
Opening the Invoices list
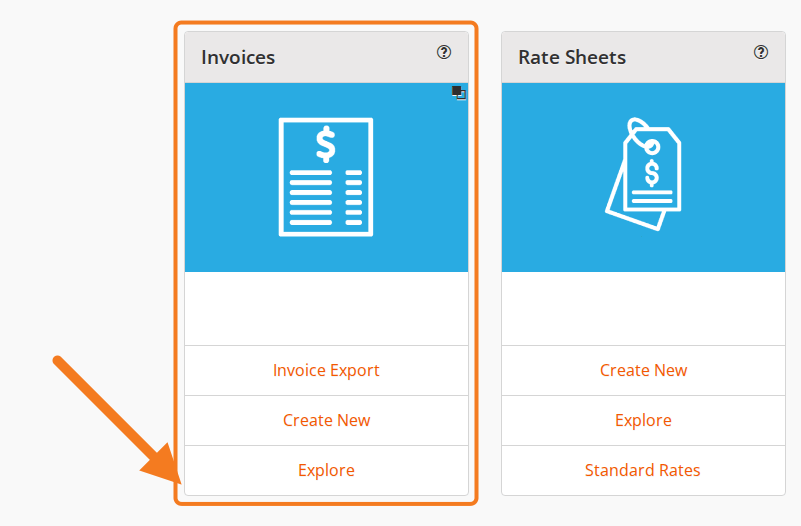
On the dashboard, in the Invoices card, click Explore.
The Invoices list opens with a strip of saved views along the top.
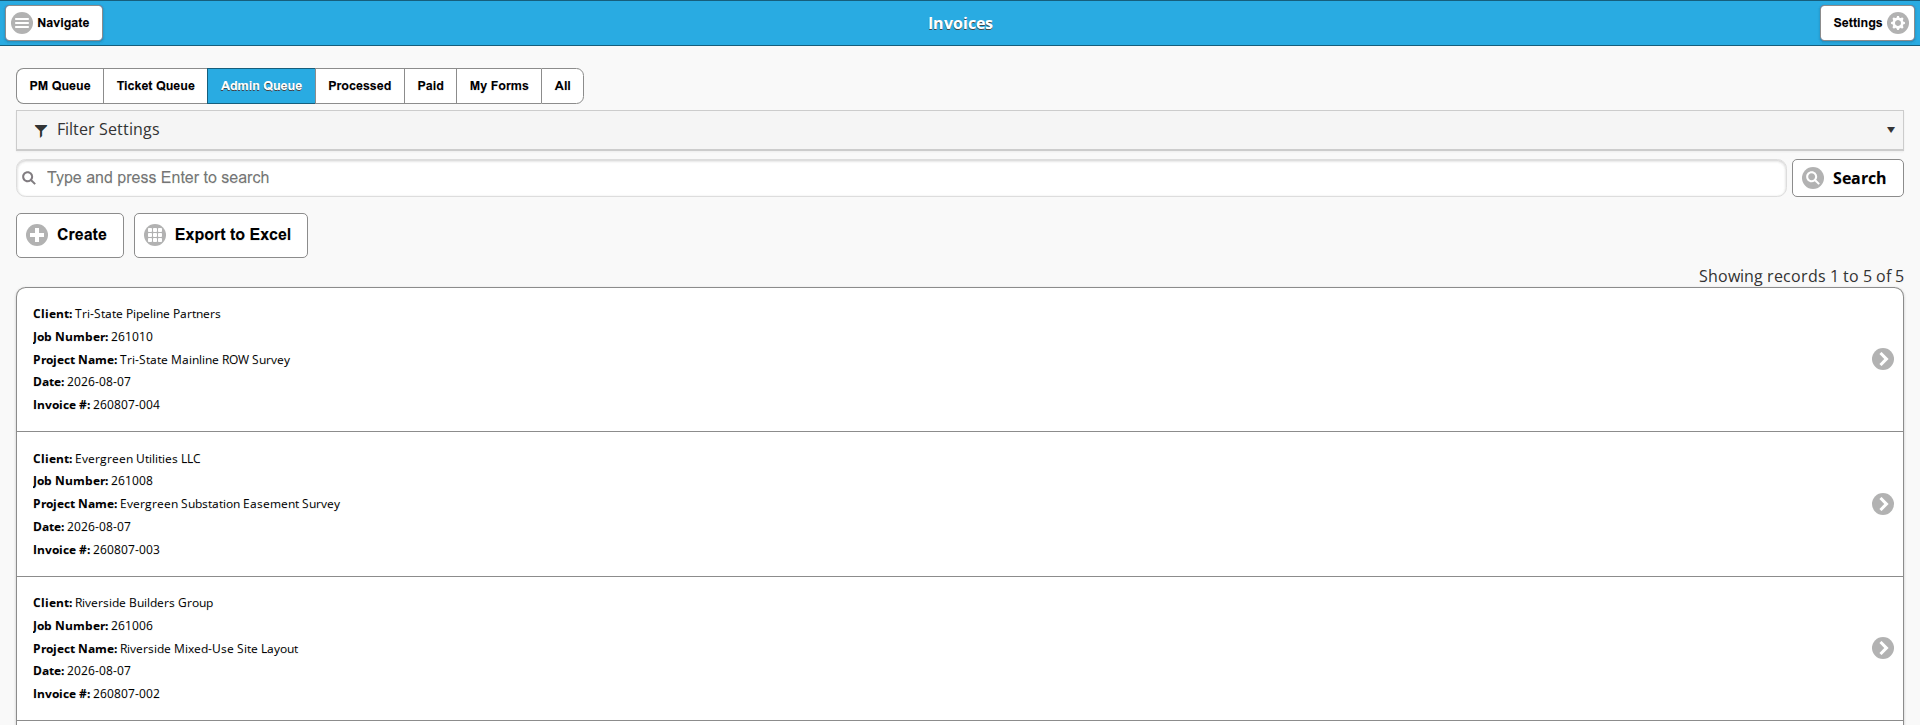
- PM Queue: new invoices, waiting for a Representative Signature from the job’s project manager.
- Ticket Queue: signed invoices for jobs set to Ticket / Invoice, on their way to the Admin Queue.
- Admin Queue: invoices waiting to be processed.
- Processed: invoices that have been processed and are waiting on payment.
- Paid: the final stage.
- My Forms: the invoices you created, whatever stage they have reached.
- All: every invoice you can see.
The rest of the screen is the same on every view:
- Filter Settings expands into a panel of filters for narrowing the view.
- The search box reads “Type and press Enter to search”. Type into it and press Enter, or click Search, to narrow the view.
- Create opens a blank invoice and Export to Excel downloads the view. Both buttons appear above and below the cards.
- A view is paged fifty records at a time, with a link to the next page beside the record counter.
- Each card reads Client:, Job Number:, Project Name:, Date: and Invoice #:, or Ticket #: in the Ticket Queue. Click the card to open that invoice.
Reviewing an invoice
Clicking a card opens the invoice’s display view, which is read-only. The buttons above the record are Edit, Export to PDF, Export to Word, Delete and Back, which returns you to the list.
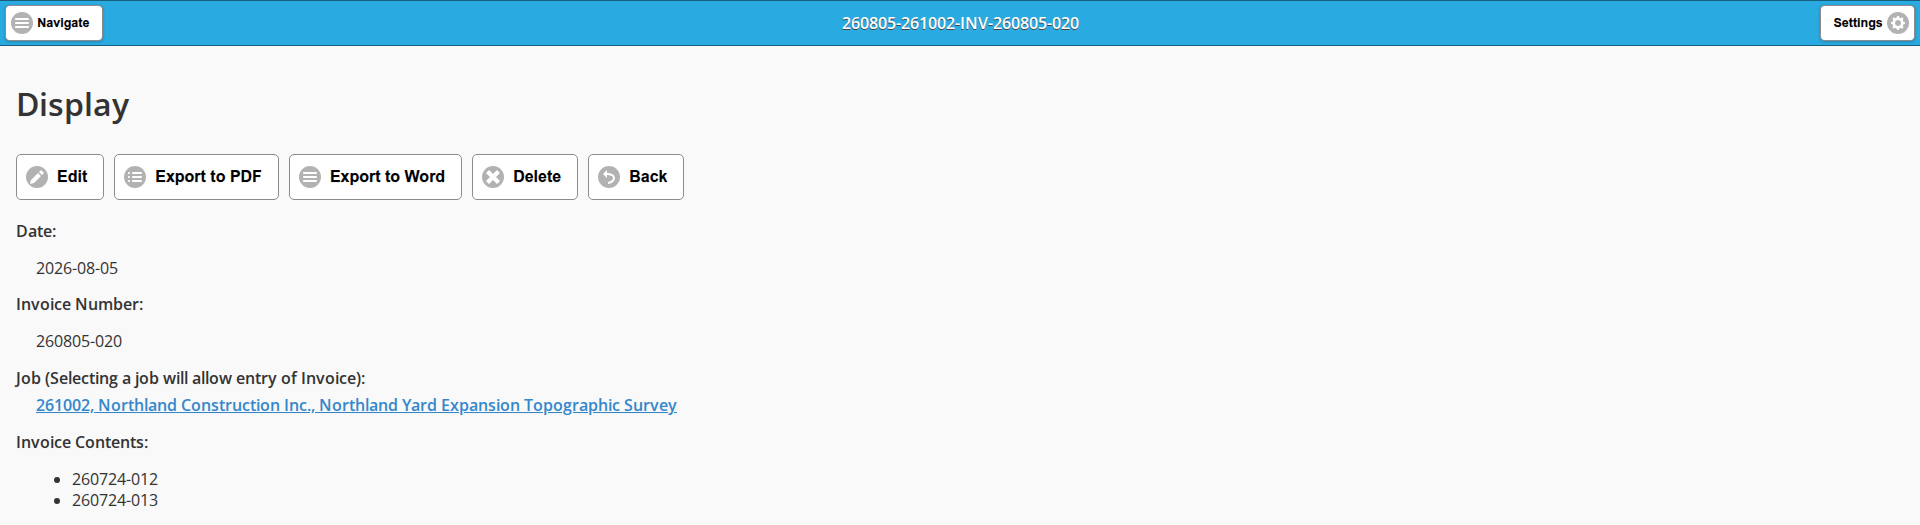
Export to PDF produces Job Book’s standard invoice, which you can print or email to the client. Export to Word produces the same invoice as a Word document, so you can edit it by hand. A company that wants its invoice laid out its own way can ask Cyanic Automation for a template, and Export to Word then uses that instead.
Below the buttons is a blue info bar. It names the stage the invoice is in and what it needs before it can move on; the messages are quoted under Moving an invoice to the next stage.
The rest of the display view is the invoice itself: Date:, Invoice Number:, the Job, which is a link to the job, and Invoice Contents:, which lists the Daily Work Records (DWRs) billed on this invoice by number. Below those come the Expenses: table, Other Info:, the Invoice Details: tabs, Terms & Conditions:, Totals:, the signature, and the Processed:, ACCT. PROGRAM REF:, Paid: and Notes: fields that record where the invoice has got to.
Creating an invoice
There are three ways in:
- On the dashboard, in the Invoices card, click Create New, then select the job.
- In the Invoices list, click Create.
- On the Active Job Dashboard, find the job in the grid and click its Create Invoice dollar icon.
The DWR Invoice Backlog is the other way to start a Time & Materials invoice: an Administrator turns approved DWRs into draft invoices in a batch, and each one lands in the PM Queue for the job’s project manager to review. Invoicing a Time & Materials Job walks through the backlog, and Invoicing a Fixed Price Job covers a lump-sum charge.
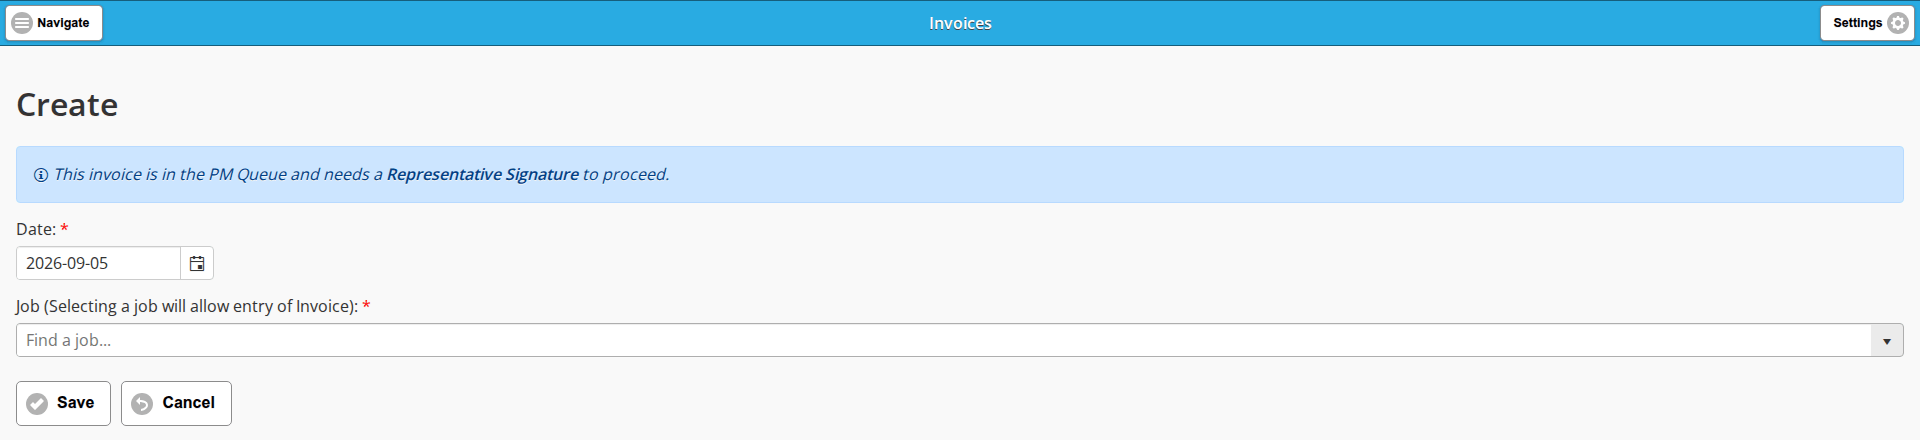
- Date: required. It defaults to today’s date.
- Job (Selecting a job will allow entry of Invoice): required. The field reads “Find a job…” until you choose one. Until a job is chosen there is nothing else on the form but Save and Cancel.
What the rest of the form offers depends on the job’s DWR Billing Type. On a Time & Materials job, Invoice Contents: appears, with the job’s DWRs waiting to be billed in Available DWRs:, the same ones the DWR Invoice Backlog holds for that job; adding them fills the Labour Costs and Equipment and Materials tabs exactly as the backlog would, or you can add rows on those tabs yourself. On a fixed price job there is no Invoice Contents: block, and the charge goes on the Fixed Price tab. The Expenses: table appears on either whenever the job has expenses.
The invoice form
Once a job is picked, the rest of the form appears. The same form is what Edit opens on an invoice that already exists, so a draft generated from DWRs and an invoice you started by hand are reviewed in the same place.
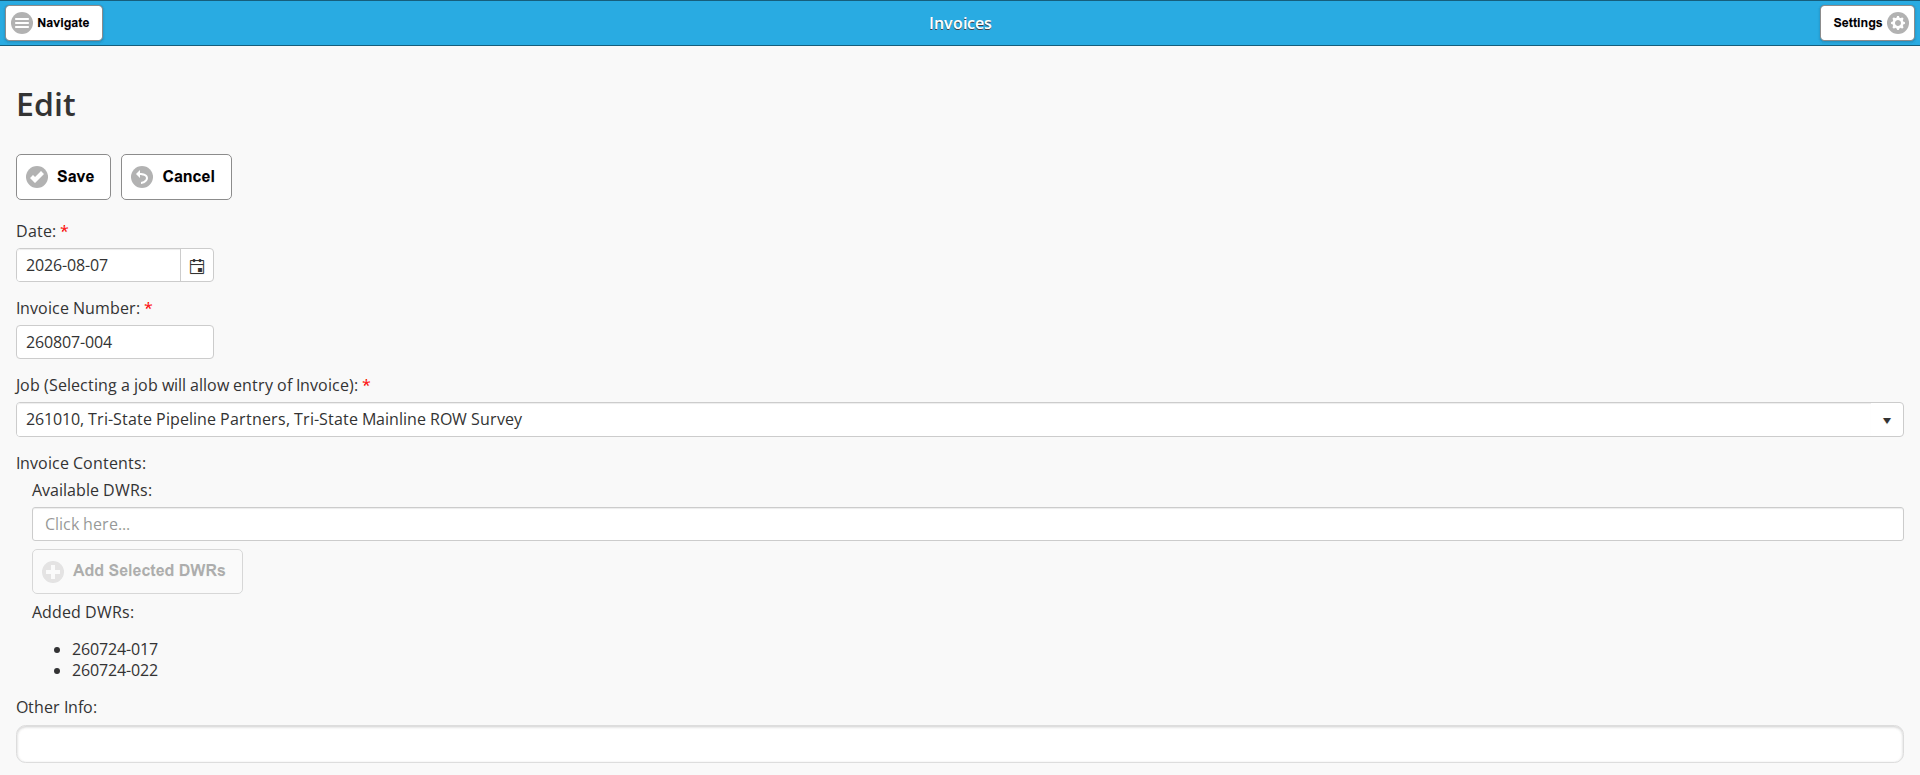
Date: and the Job are as on the create form. Beside them:
- Invoice Number: assigned by Job Book when the invoice is first saved, which is why it is not on the blank create form. On the edit view it is a required field, and you can change it.
- Invoice Contents: on a Time & Materials job, this is where DWRs are attached to the invoice, on the create form and the edit view alike. Available DWRs: is a picker reading “Click here…”, Add Selected DWRs moves your choices onto the invoice, and Added DWRs: lists the DWR numbers already on it. The display view shows the same block as a plain list of numbers.
- Other Info: free text that goes on the invoice.
Below those, Invoice Details: holds the tabs Labour Costs, Equipment and Materials, Fixed Price, Unpriced, Job Details and Attachments, in that order. Save and Cancel sit above and below the whole form and apply to all of it.
The Labour Costs tab
The Labour Costs tab lists the labour imported from DWRs on a Time & Materials invoice, one row per DWR line. The job’s Invoice Line Item Type does not change that: a job set to Summarized combines the rows only on the exported invoice.
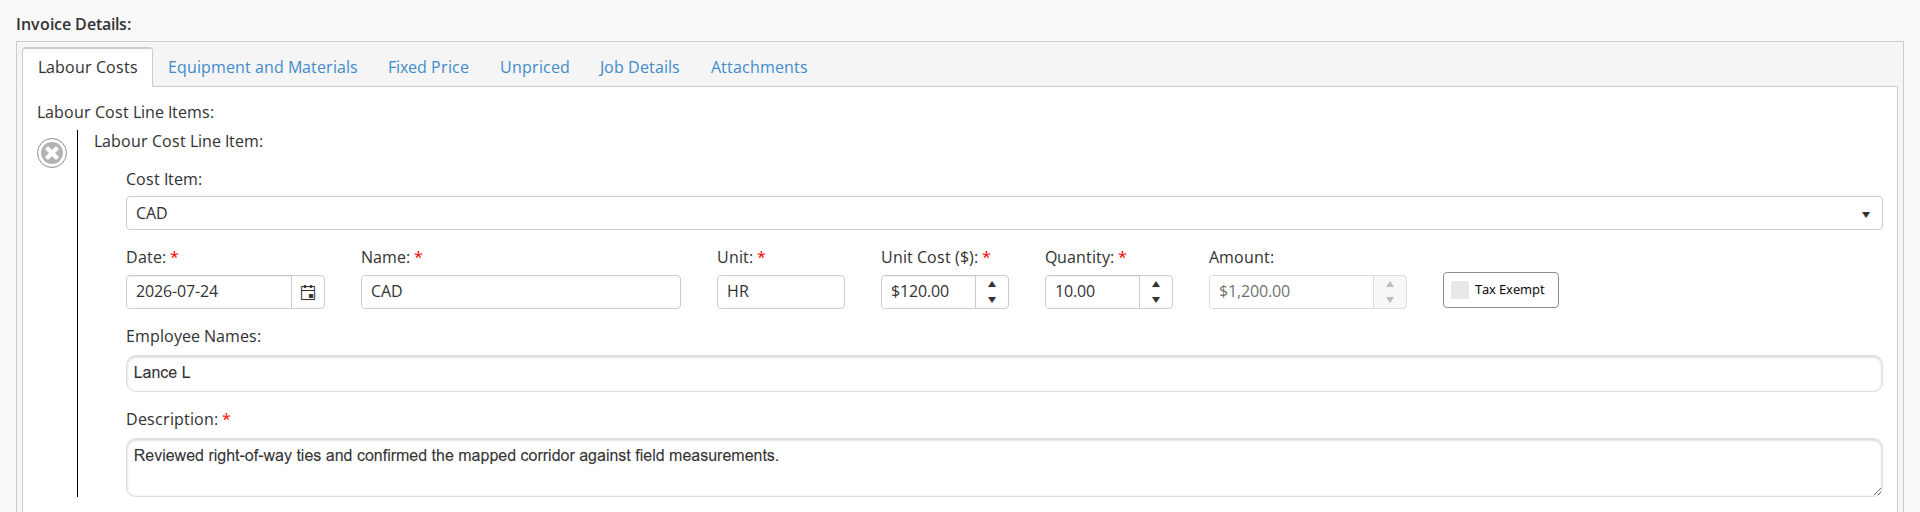
Under Labour Cost Line Items:, each Labour Cost Line Item: row holds:
- Cost Item: the labour line item being billed.
- Date: required. The day the work was done.
- Name: required.
- Unit: required, such as HR.
- Unit Cost ($): required. The billing rate.
- Quantity: required. The hours or units being billed.
- Amount: calculated for you from the unit cost and the quantity; you cannot type in it.
- Tax Exempt: a checkbox on each row.
- Employee Names: who did the work.
- Description: required.
Add at the bottom of the tab opens another row, and the circled X beside a row removes it.
The Equipment and Materials tab
The Equipment and Materials tab works the same way, under the heading Other Cost Line Items (Incidentals, Equipment, Materials):.
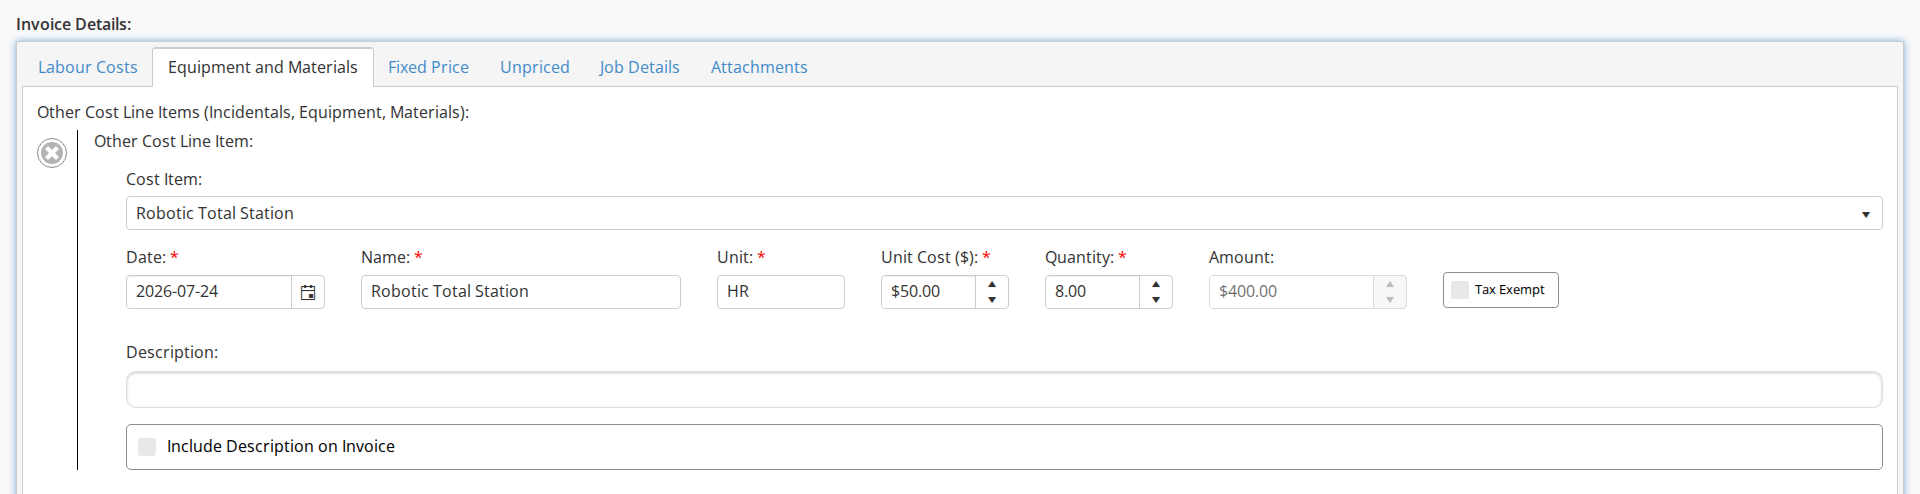
An Other Cost Line Item: row has the labour row’s fields without Employee Names:, and it adds one control the other tabs do not have:
- Include Description on Invoice: tick it to carry that row’s description onto the invoice.
The Fixed Price tab
The Fixed Price tab is where a lump-sum charge goes.
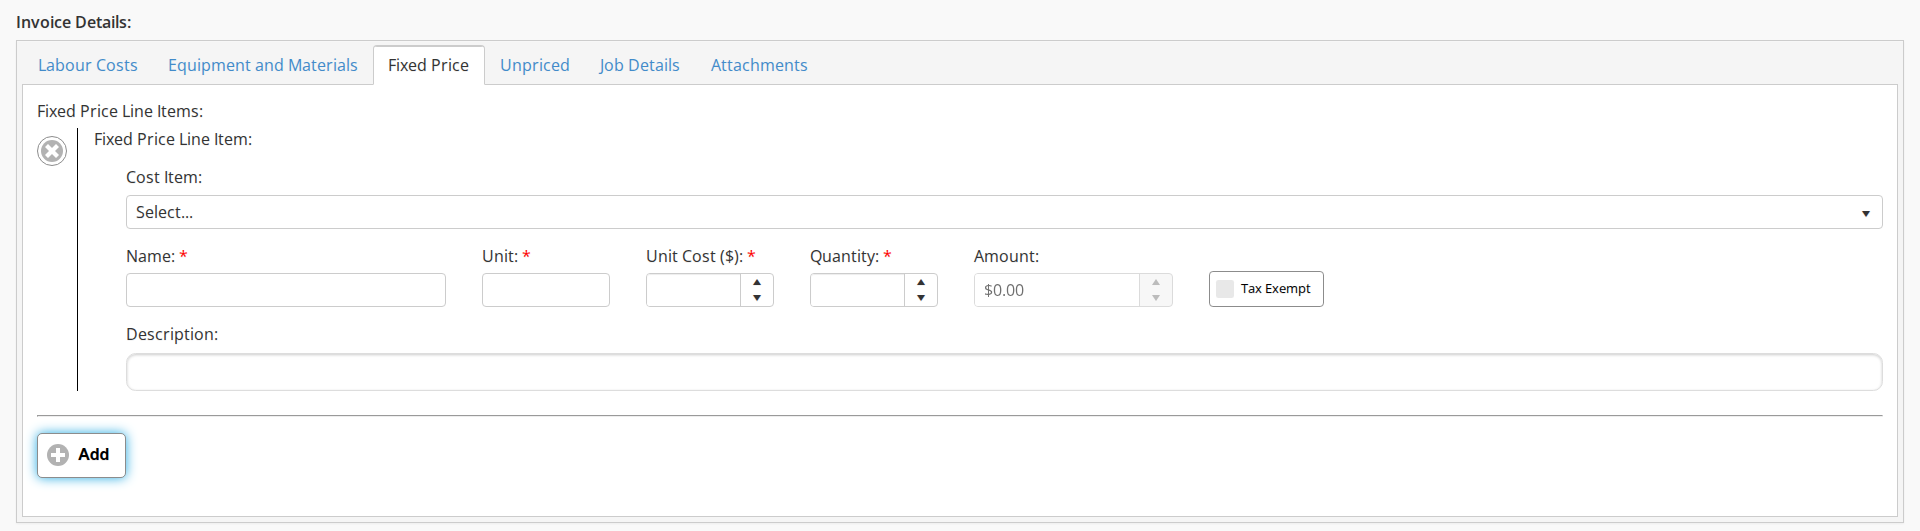
A fixed price row has no Date: or Employee Names: field, and Description: is optional; the rest works as on the Labour Costs tab. Adding the charge is walked through on Invoicing a Fixed Price Job.
The Unpriced tab
The Unpriced tab is for items you want the client to see without a charge against them: notes or explanations. Under Line Items:, click Add to insert an unpriced line item, click the new description field, and type the note, such as “survey control monuments left on site for your reference.”
The Job Details tab
The Job Details tab is read-only. It shows the original job data, so you can check you are billing the right job before you send anything out.
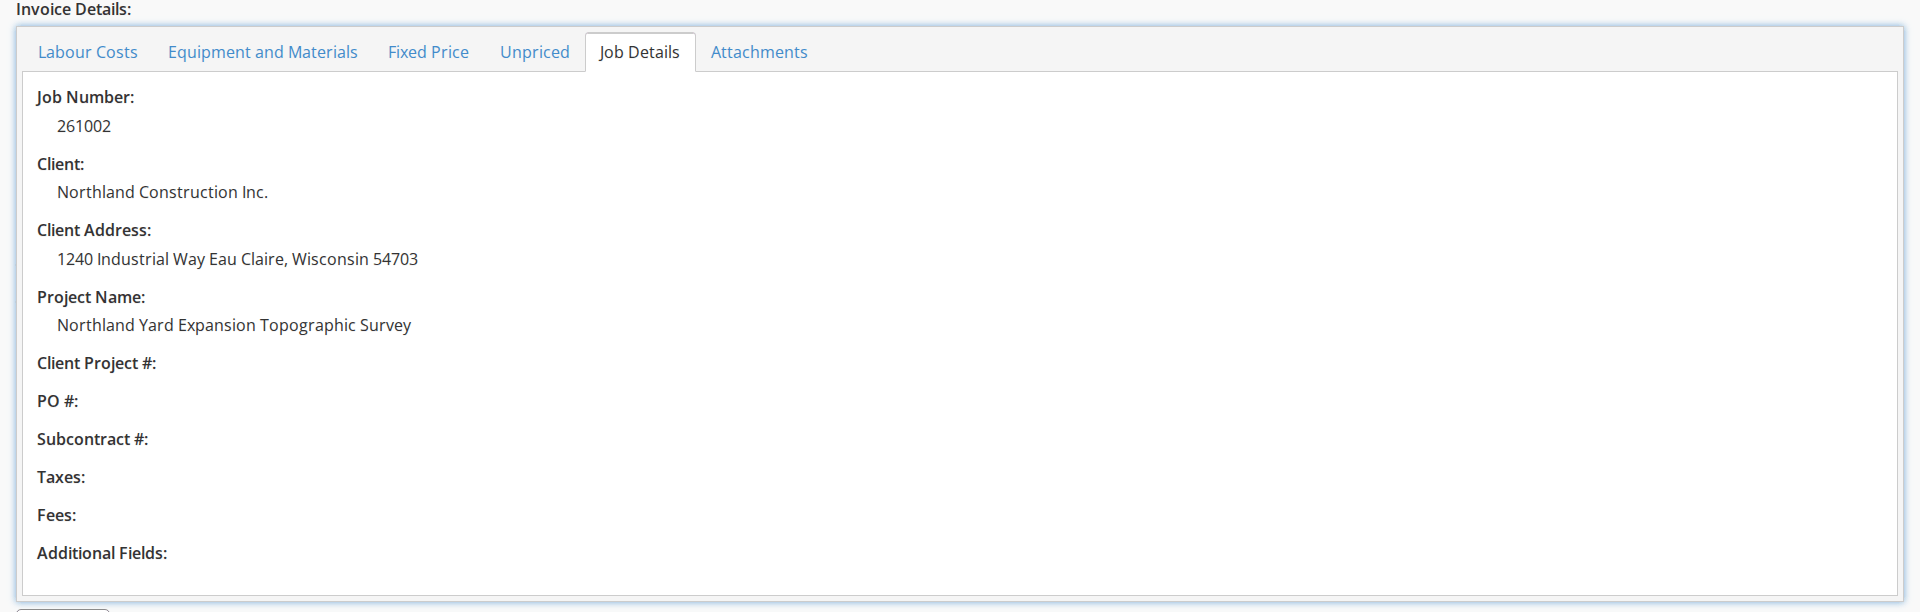
The fields are Job Number:, Client:, Client Address:, Project Name:, Client Project #:, PO #:, Subcontract #:, Taxes:, Fees: and Additional Fields:.
The Attachments tab
Attachments are for internal use. Click Add under Attachments: to upload a file.
Terms, totals and the signature
Below the tabs come the fields that apply to the whole invoice.
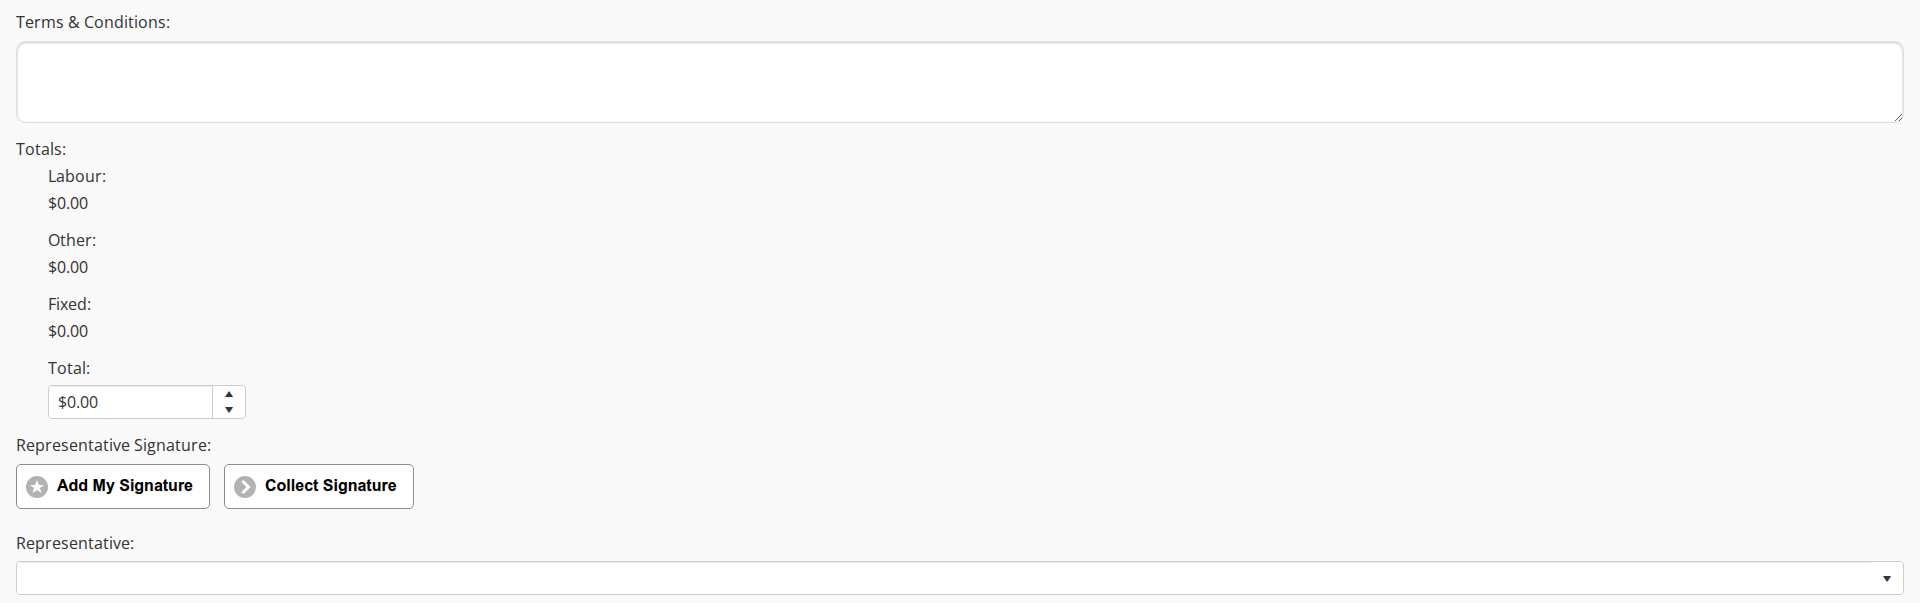
- Terms & Conditions: the terms that print on this invoice’s PDF. The box starts empty, and an empty box means no terms on the PDF. Contact Cyanic Automation to set default terms for your company; after that they print whenever the box is left empty, and anything you type here replaces them on this invoice.
- Totals: Labour:, Other: and Fixed: are a subtotal per section and each one updates automatically. Total: is the sum. On a fixed price job you can type over it to set a bottom-line figure of your own; on a Time & Materials invoice it is calculated and you cannot type in it.
- Representative Signature: this is where the job’s project manager, or an Administrator, signs off on the invoice to confirm it has been reviewed and all charges are accurate. Add My Signature inserts your saved signature and fills in your name; Collect Signature takes a signature on the spot. Once a signature is on the invoice the buttons become View and Delete.
- Representative: names who signed.
Click Save.
The Expenses table
When the job has expenses of its own, an Expenses: table appears on the invoice, between the Job field and Other Info:. It is a section of the form, not one of the Invoice Details tabs.

- The table has one row per expense, with columns Date, Employee, Item, Amount, Status and Description. The date on each row is a link to the expense itself.
- Each row carries a checkbox, and the header carries one that selects them all.
- The note above the table reads “Selected expenses will be considered ‘processed’ when saved.”
- Open in Window sits above the table on the right.
Ticking a row and saving the invoice is how an expense is marked Processed. Ticking it does not bill it: the charge itself comes from the invoice’s line items, so a staff expense the client is to pay for needs a Fixed Price or Equipment and Materials line item as well. It is not done from the Expense Approval Backlog, which only approves expenses. See Expense Approval. On the display view the same table appears without checkboxes, under a note that reads, as the app has it, “The follow expenses are associated with this invoice.”
Moving an invoice to the next stage
The blue info bar at the top of the invoice tells you where it is and what it needs. Each stage is a checkbox or a signature on the form, so moving an invoice on means opening it, making that one change and saving.
In the PM Queue, the bar says: “this invoice is in the PM Queue and needs a Representative Signature to proceed.” Click Edit, review and adjust the line items, click Add My Signature, and click Save. The invoice leaves the PM Queue.
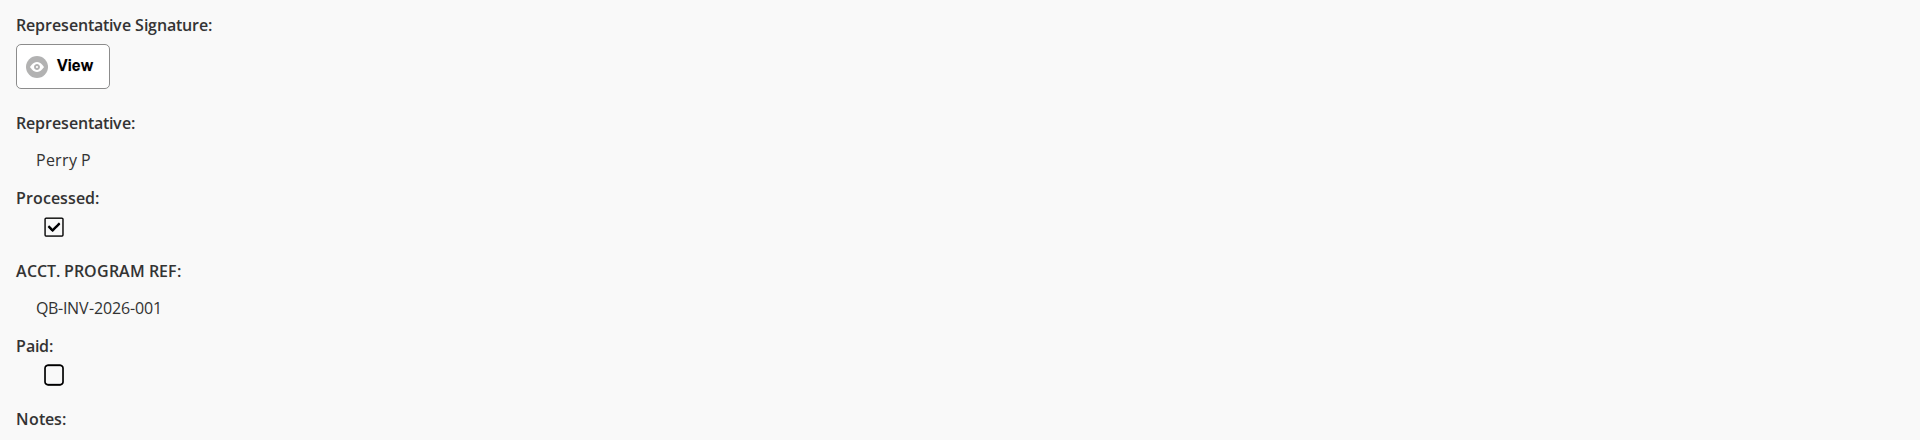
In the Ticket Queue, the bar says: “this invoice is in the Ticket Queue and needs the Client Approved Ticket checkbox to be checked to proceed.” Only an invoice on a job whose Invoice Type is Ticket / Invoice stops here, and while it does, Job Book calls it a ticket: the list card reads Ticket #:, and the title over the record and the name of the exported file carry TICKET where an invoice has INV. Export to PDF produces the ticket itself: the hours and quantities without the money, and an Approved by line for the client to sign. Such an invoice carries one field the others do not: a Client Approved Ticket checkbox, between Representative: and Processed: at the foot of the form. It is where the client’s approval of the ticket is recorded: click Edit, check Client Approved Ticket, and click Save. The invoice then moves on to the Admin Queue.
In the Admin Queue, the bar says: “this invoice is in the Admin Queue and needs the Processed checkbox to be checked for the invoice to be Processed.” What happens first depends on your company’s workflow: Job Book does not send invoices itself, so you might export the PDF and email it to the client, or export it to your accounting system. When that is done, click Edit, check the Processed checkbox, and, if your process includes importing invoices into accounting, record the accounting reference number in ACCT. PROGRAM REF: below it. That number links the accounting invoice back to Job Book. Click Save, and the invoice moves to the Processed view.
When an invoice reaches the Admin Queue it also appears in the Invoice Process Backlog, where an Administrator exports invoices to the accounting system and processes them a batch at a time.
In Processed, the bar says: “this invoice is in Processed and needs the Paid checkbox to be checked for the invoice to be Paid.” What happens after processing again depends on whether you track payments in Job Book: some of our customers do, others leave it to their accounting software. To record payment, click Edit, find the Paid checkbox at the bottom of the page, check it and click Save. The invoice moves to the Paid view.
To reverse the processing, edit the invoice, uncheck Processed, and save. The invoice returns to the Admin Queue.
Notes: sits below Paid and takes free text about the invoice at any stage.
Exporting invoice lines by date range
The third link on the Invoices card puts invoice lines into Excel. On the dashboard, in the Invoices card, click Invoice Export.
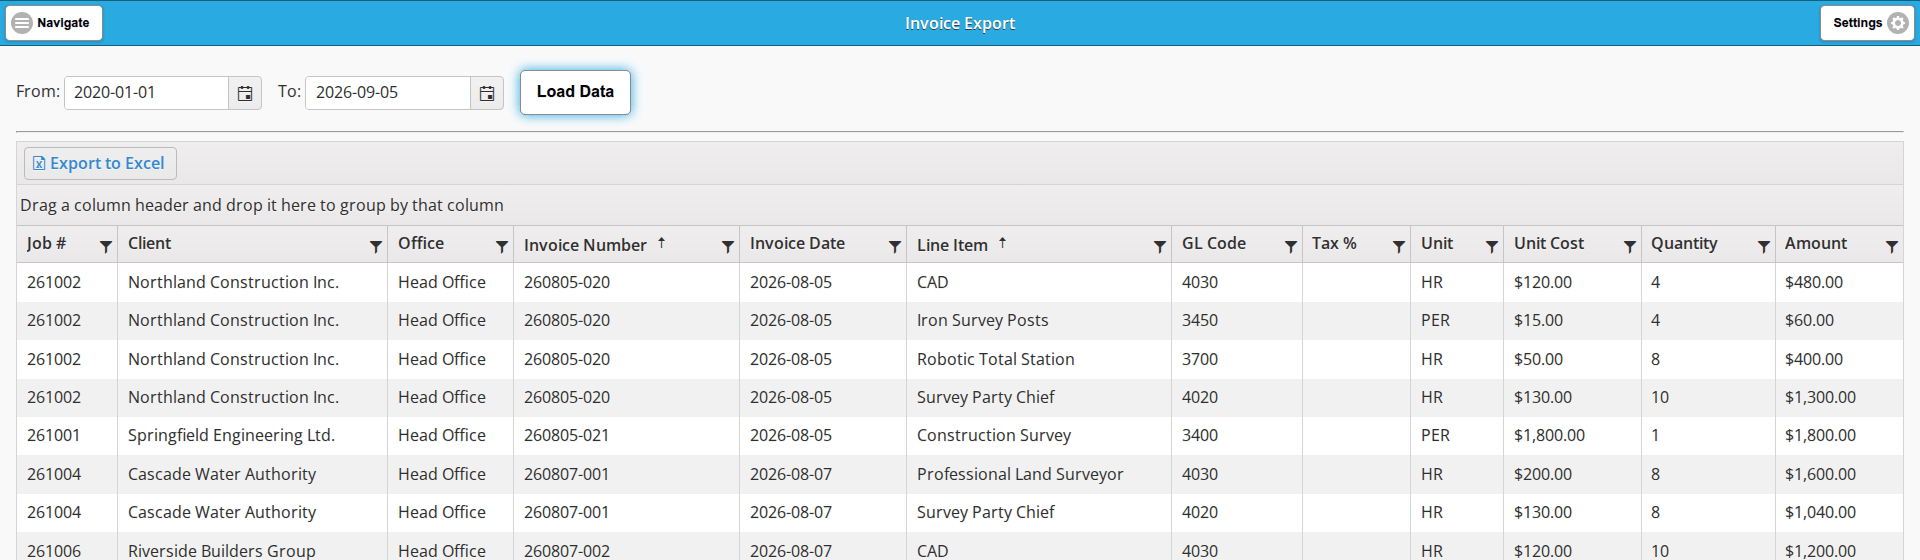
- From: and To: open on the last fourteen days. Set the range you want and click Load Data.
- The grid gives one row per invoice line item, with the columns Job #, Client, Office, Invoice Number, Invoice Date, Line Item, GL Code, Tax %, Unit, Unit Cost, Quantity and Amount.
- Each column header has a funnel icon for filtering, and the strip above the headers reads “Drag a column header and drop it here to group by that column”. The funnel opens the Filter panel that Report Grids describes, with the same operators, and sorting and grouping work as they do there. There is no column menu and no template toolbar here.
- Export to Excel downloads what the grid is showing.
GL Code is the line item’s Accounting Code, set on the cost item itself under Administration to match the code your accounting system uses; see Administration Settings.
Running Invoice Export changes nothing about the invoices. The file your accounting system imports comes from Export Selected Invoices on the Invoice Process Backlog instead.
Best practices
- Administrators: check the DWR Invoice Backlog regularly, so that all approved DWRs become draft invoices.
- The job’s project manager: review the PM Queue frequently so invoices do not wait there for a signature.
- Review invoices weekly so a wrong rate or a missing DWR is caught before the invoice reaches the client.
Video
 Coming soon
 Last updated