

Users and Employee Profiles
How an Administrator creates users, assigns the roles (Technician, Job Coordinator, Manager and Administrator) and creates the employee profiles that work, time and leave are recorded against.
User accounts
Users log in to Job Book with an email and a password. If you forget your password, reset it from the login page and a reset email goes to the address on file. What a user can see and do, their permissions, comes from the roles ticked on the account.
Users and employees are two different things in Job Book:
- A user is someone who can log into the Job Book system.
- An employee is a person you can assign work to, record time for, or reference in the system, whether or not they have a login. See Employees.
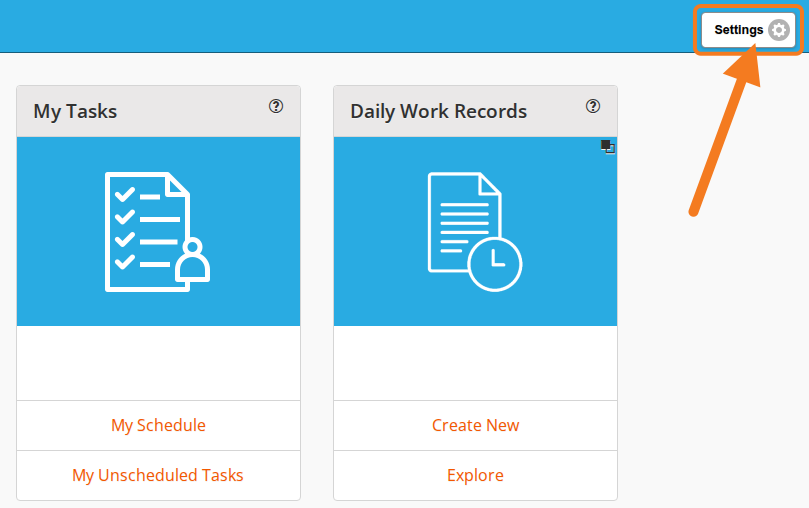
Both are managed from the Settings button in the top-right corner of every page.
Administrators are the only users who can manage users and employees.
User Roles
Job Book has a fixed set of roles. Technicians handle fieldwork and drafting. Managers approve timesheets, invoices and expenses, and view reports. Job Coordinators create jobs and set rates. Administrators can do all that, plus manage users and employees.
Roles are checkboxes on the user form, so a user can hold more than one, and a user with two roles gets everything each role grants. Job Coordinator is the role that is usually added to another.
“The job’s project manager” is a different thing: the person named in the Project Manager field of a job. See Job Setup.
Which cards a role sees also depends on the modules your company has licensed, so two companies on the same role can see different dashboards. Tasks / Scheduling, Leave Requests, Assets and Safety are all optional.
Technician
This role is for staff who will be entering timesheets (Daily Work Records), expenses and safety forms into the system. Technicians do not have access to any financial information, and can generally only see records that they entered themselves.
The cards a technician’s dashboard carries are listed under What each role sees.
Job Coordinator
This role adds the permissions needed to create and update Jobs and Clients and to set the rates on a job. It works on its own, but in practice it is paired with a second role: tick Job Coordinator alongside Technician for a field lead who also sets up jobs, or alongside Manager for an office user who does.
- Technician and Job Coordinator adds creating and editing jobs and clients, and setting the rates on a job, to what a Technician can do.
- Manager and Job Coordinator gives a Manager Create New on clients and jobs, and Edit and Clone on a job, which a Manager alone does not have.
- Administrator and Job Coordinator adds nothing, because an Administrator already has it all.
On its own, a Job Coordinator can create and edit jobs and clients, set rates on a job, and enter their own Daily Work Records, expenses and leave requests. They can view rate sheets, the Standard Rates list and assets, but not change them. They have no access to invoices, the workflow backlogs, the company cost and time reports or Safety forms.
The cards a Job Coordinator’s dashboard carries, alone or paired with another role, and which links each has, are listed under What each role sees.
Manager
Managers can do Technician tasks, plus approvals and invoicing. They have access to financial information and can view all reports, but cannot create jobs or change rates.
The difference between a Manager and an Administrator shows in what a Manager can do with the cards they share:
- On a job, the Edit, Clone and Delete buttons are hidden, so a Manager views and exports jobs rather than maintaining them. See Job Setup.
- A Manager cannot create or edit clients. See Clients.
- A Manager cannot create rate sheets.
- A Manager can create invoices. See Invoices.
Which links each card keeps for a Manager is listed under What each role sees.
Administrator
This role has access to everything in the system, including creating and editing Clients, Jobs, Rate Sheets and line items. Administrators can also create and delete users, set user roles, and create employee profiles. An Administrator’s dashboard carries every card, with Create New on every card that has one.
There is no editable permission matrix: the permissions in the tables below are fixed by the product.
Which screens each role can view
A ✔ means the role can reach that screen. “(Their own)” means the role sees only the records they entered or that name them. A user who holds two roles gets every tick in both columns.
| Technician | Job Coordinator | Manager | Administrator | |
|---|---|---|---|---|
| Navigate | ||||
| Clients | ✔ | ✔ | ✔ | |
| Equipment and Materials | ✔ | ✔ | ✔ | ✔ |
| Expense Items | ✔ | ✔ | ✔ | ✔ |
| Jobs | ✔ | ✔ | ✔ | ✔ |
| Labour Cost Items | ✔ | ✔ | ✔ | ✔ |
| Fixed Price Items | ✔ | ✔ | ✔ | ✔ |
| Offices | ✔ | ✔ | ✔ | ✔ |
| Training Courses | ✔ | ✔ | ||
| Vehicles | ✔ | ✔ | ✔ | |
| Rate Sheets | ✔ | ✔ | ✔ | |
| Assets | ✔ | ✔ | ✔ | ✔ |
| Expenses | ✔ (Their own) | ✔ (Their own) | ✔ | ✔ |
| DWRs | ✔ (Their own) | ✔ (Their own) | ✔ | ✔ |
| Invoices | ✔ | ✔ | ||
| Safety | ✔ (Their own) | ✔ | ✔ | |
| Settings | ||||
| Users | ✔ | |||
| Roles | ✔ | |||
| Employee Profiles | ✔ (Their own) | ✔ (Their own) | ✔ (Their own) | ✔ |
Modify / Create / Delete
| Technician | Job Coordinator | Manager | Administrator | |
|---|---|---|---|---|
| Navigate | ||||
| Clients | ✔ | ✔ | ||
| Equipment and Materials | ✔ | |||
| Expense Items | ✔ | |||
| Jobs | ✔ | ✔ | ||
| Labour Cost Items | ✔ | |||
| Fixed Price Items | ✔ | |||
| Offices | ✔ | |||
| Training Courses | ✔ | |||
| Vehicles | ✔ | |||
| Rate Sheets | ✔ | |||
| Assets | ✔ | ✔ | ✔ | |
| Expenses | ✔ (Their own) | ✔ (Their own) | ✔ | ✔ |
| DWRs | ✔ (Their own) | ✔ (Their own) | ✔ | ✔ |
| Invoices | ✔ | ✔ | ||
| Safety | ✔ (Their own) | ✔ | ✔ | |
| Settings | ||||
| Users | ✔ | |||
| Roles | ✔ | |||
| Employee Profiles | ✔ (Their own) | ✔ (Their own) | ✔ (Their own) | ✔ |
Report Access
| Technician | Job Coordinator | Manager | Administrator | |
|---|---|---|---|---|
| Reports | ||||
| Active Job Dashboard | ✔ | ✔ | ✔ | |
| Expense Report | ✔ | ✔ | ||
| Invoice Export | ✔ | ✔ | ||
| Job Maps | ✔ | ✔ | ✔ | |
| Line Item Report | ✔ | ✔ | ||
| Manage Assets | ✔ | ✔ | ||
| My Expenses | ✔ | ✔ | ✔ | ✔ |
| My Time Cards | ✔ | ✔ | ✔ | ✔ |
| Standard Rates | ✔ | ✔ | ✔ | |
| Time Card Report | ✔ | ✔ | ||
| Time Grid | ✔ | ✔ | ||
| Utilization Report | ✔ | ✔ | ||
| WIP Report | ✔ | ✔ | ||
| Workflow | ||||
| DWR Approval Backlog | ✔ | ✔ | ||
| DWR Invoice Backlog | ✔ | ✔ | ||
| Expense Approval Backlog | ✔ | ✔ | ||
| Invoice Process Backlog | ✔ | ✔ |
- Invoice Export is a link on the Invoices card and Standard Rates is a link on the Rate Sheets card, so a role reaches them only if it has that card. See Standard Rates.
- Technicians do not get the Active Job Dashboard, even though jobs appear on their DWRs.
Tasks / Scheduling (if module enabled)
| Technician | Job Coordinator | Manager | Administrator | |
|---|---|---|---|---|
| Navigate | ||||
| Task Templates | ✔ | ✔ | ✔ | ✔ |
| Reports and Utilities | ||||
| Task Dashboard | ✔ | ✔ | ||
| Task Scheduler | ✔ | ✔ | ||
| My Schedule | ✔ | ✔ | ✔ | ✔ |
| My Unscheduled Tasks | ✔ | ✔ | ✔ | ✔ |
A Job Coordinator opens a job’s task plan from Manage Task Plan on the job, and can look at task templates from the Navigate menu but not change them. See Tasks and Scheduling.
Leave Requests (if module enabled)
| Technician | Job Coordinator | Manager | Administrator | |
|---|---|---|---|---|
| Navigate | ||||
| Leave Requests | ✔ (Their own) | ✔ (Their own) | ✔ | ✔ |
| Reports and Utilities | ||||
| Company Calendar | ✔ | ✔ | ✔ | ✔ |
| Leave Request Report | ✔ | ✔ |
Anyone can request leave, and a technician sees only their own requests. See Leave Tracking.
Adding Users and Setting Roles
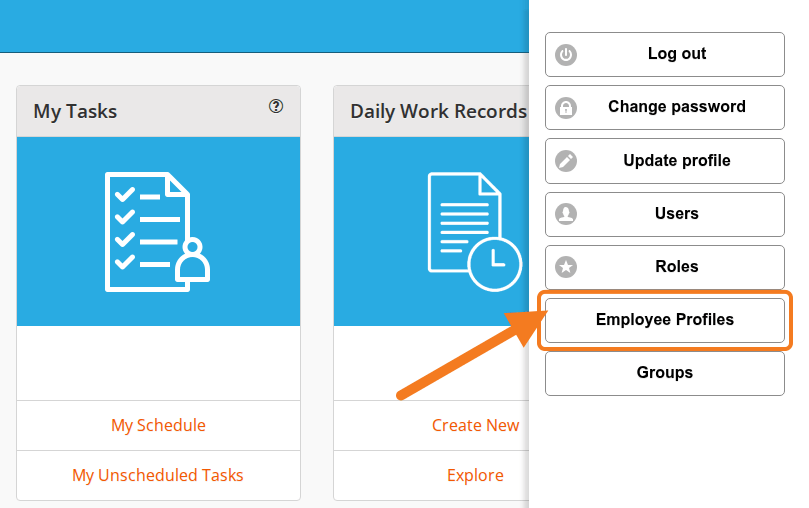
Click Settings in the top-right corner.
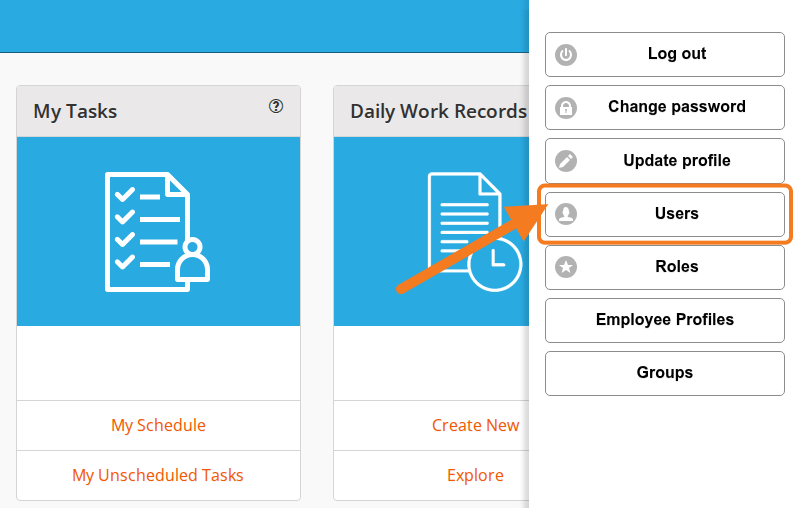
Then click Users in the menu that opens.
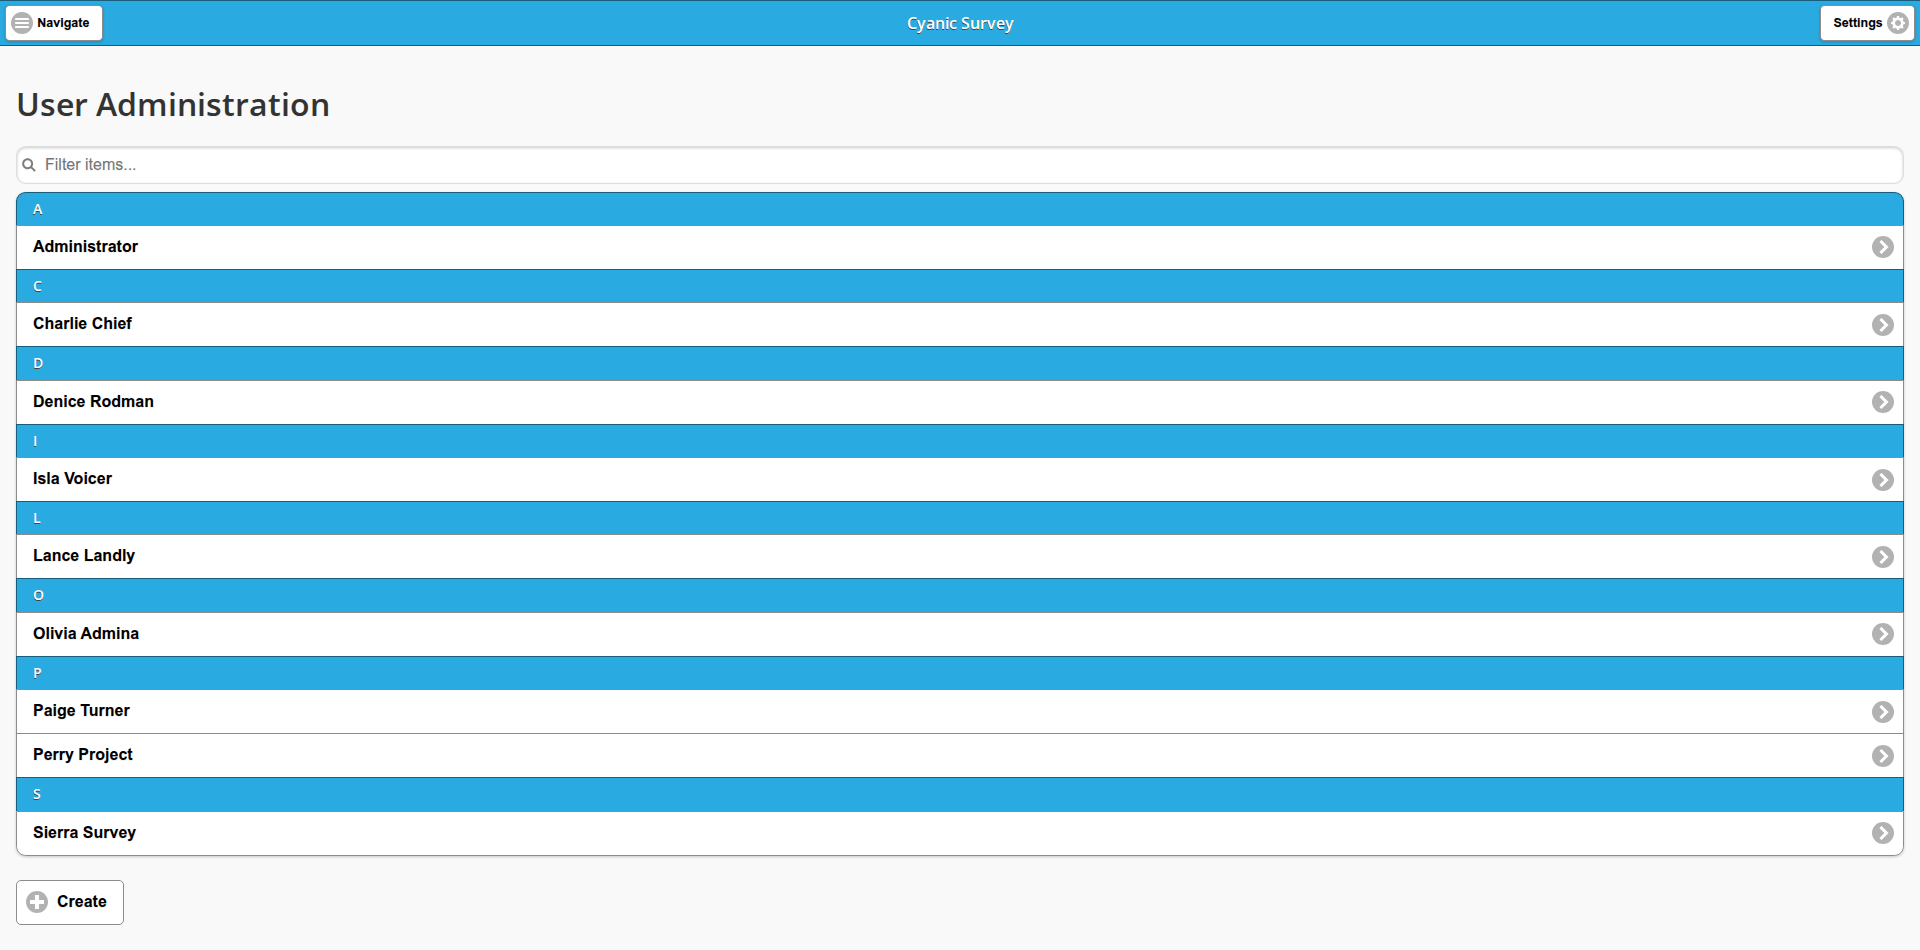
The screen is titled User Administration and lists every user in the system, grouped under the first letter of their name, with a Filter items… box above them and a Create button below.
Click Create. The form is titled Create User, under a New User bar carrying a Back button.
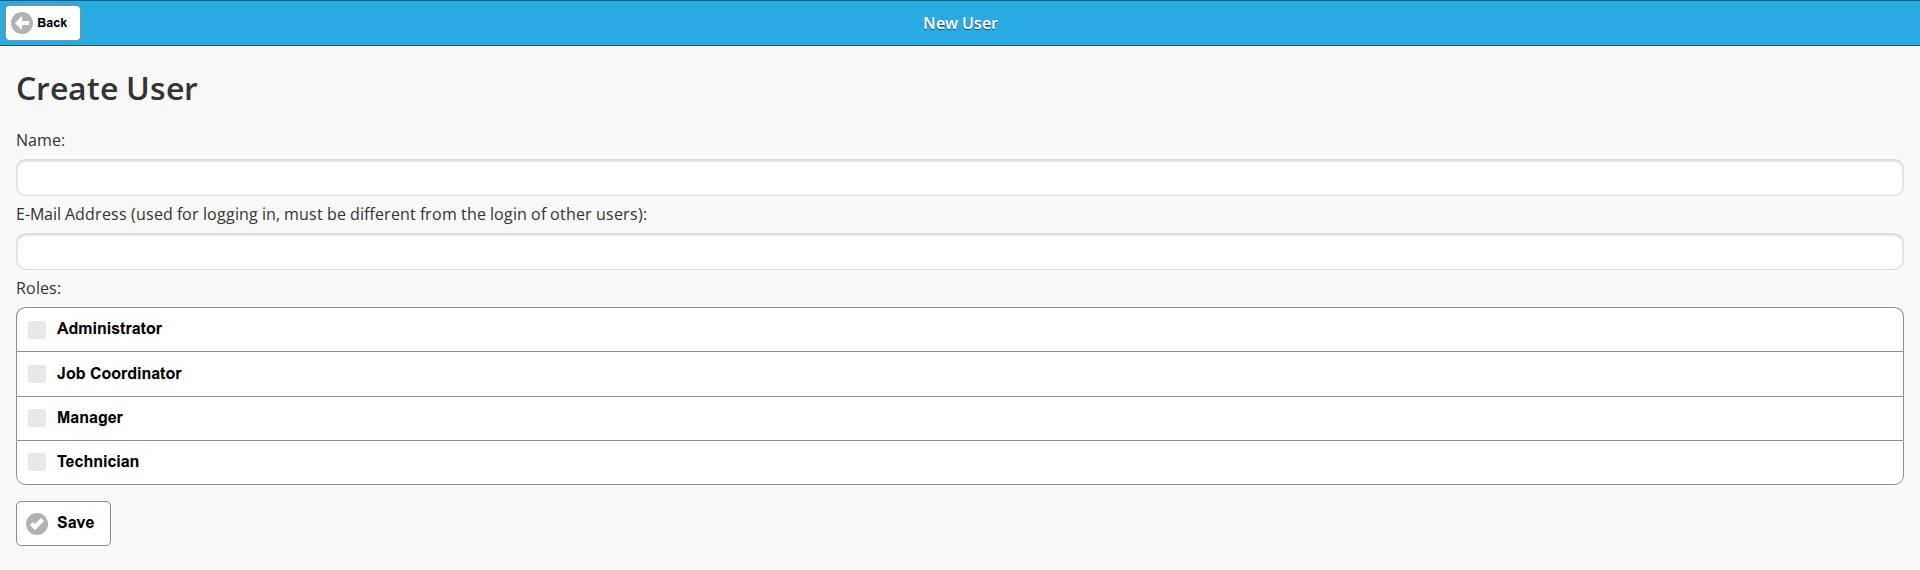
- Name: the name of your user.
- E-Mail Address (used for logging in, must be different from the login of other users): the address the user will log in with.
- Roles: checkboxes for Administrator, Job Coordinator, Manager and Technician. Tick every role that applies. A party chief, for example, gets the Technician role, and a party chief who also sets up jobs gets Technician and Job Coordinator.
Click Save. The user is created and a password creation email goes to the address you entered, so make sure that address exists or the user will never receive it.
You can edit a user’s name or roles later. If you change the email, the system does not automatically resend the password setup email. You will need to trigger a password reset manually from the login page. What the new user sees from the email onwards is described in Site Staff Initial Setup.
Roles, the entry below Users in the Settings menu, opens the screen titled Role Administration. It shows who holds each role, and lets you add users to a role or remove them from it, so it is the other place a user’s roles can be changed.
Employees
In Job Book you assign jobs to an employee profile, not a user account. Timesheets are also linked to employee profiles. For example, a party chief can create timesheets for staff who do not have login access but still need their time recorded.
The employee name is what everyone sees across the system, and it is what gets picked in more places than timesheets:
- On the line items of a DWR, where hours are recorded against an employee.
- In the Employee: picker on an expense, which defaults to you and can be someone else.
- On the Task Scheduler, where tasks are assigned to employees by dragging them onto the employee’s row.
- On a leave request, and in the Leave Job: and Leave Manager: fields of the profile itself.
How the link to a user works:
- Linked to a user: that person can log in, create timesheets and sign documents.
- Not linked to a user: that person cannot log in, but can be assigned work and have time recorded to them by someone else.
- A user with no employee profile: that person can log into Job Book because they have a user account, but cannot be used in the system to record time or sign documents. Their dashboard tells them so, in the red bar quoted on Site Staff Initial Setup.
The employee name does not have to match the user name. When people are in the Job Book system they only ever see the employee profiles, so an employee named “Charlie C” linked to the user “Charlie Chief” shows up everywhere as Charlie C.
The Employee Profiles list
Click Settings in the top-right corner.
Then click Employee Profiles in the menu that opens.
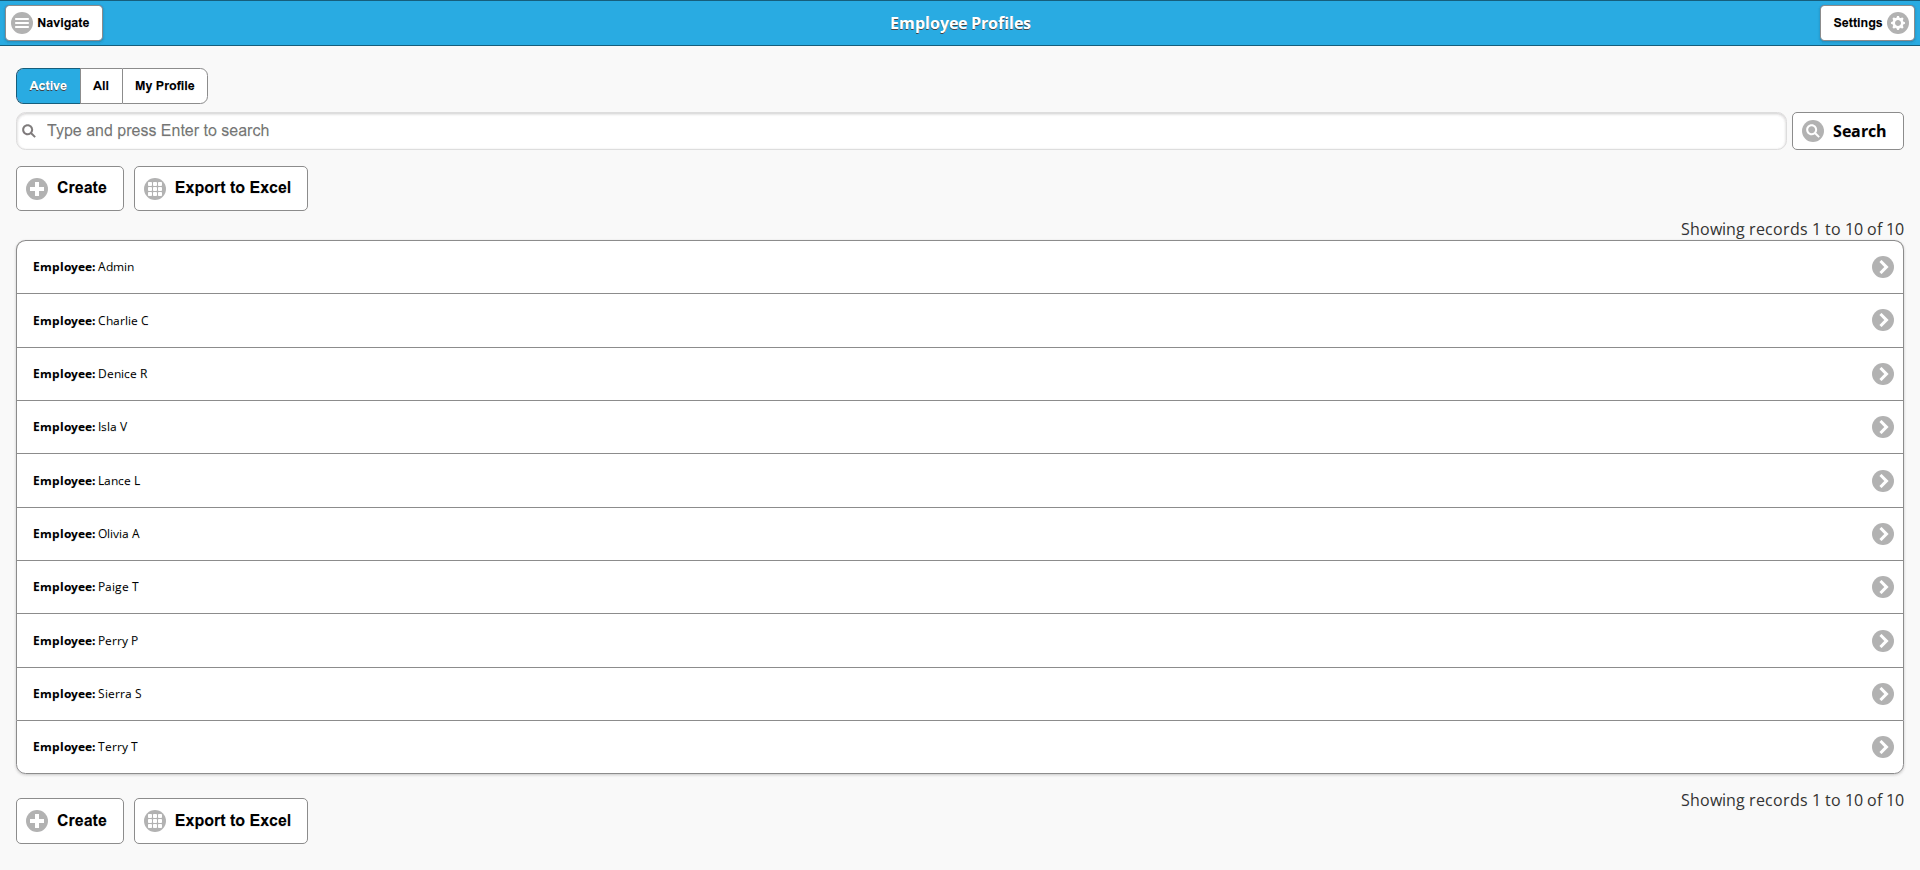
- The saved views above the list: Active shows the employees still in use, All shows the active and inactive employees together, and My Profile holds a single record, your own.
- The search box reads “Type and press Enter to search”, with a Search button beside it.
- Create and Export to Excel sit above and below the cards, and a record count reads, for instance, “Showing records 1 to 10 of 10”. On the My Profile view there is no Create button, only Export to Excel.
- Each card reads Employee: followed by the employee name. Click a card to open that employee, then click Edit to make changes later.
Adding Employees
Click Settings, then click Employee Profiles, then click Create. The form is titled Create.
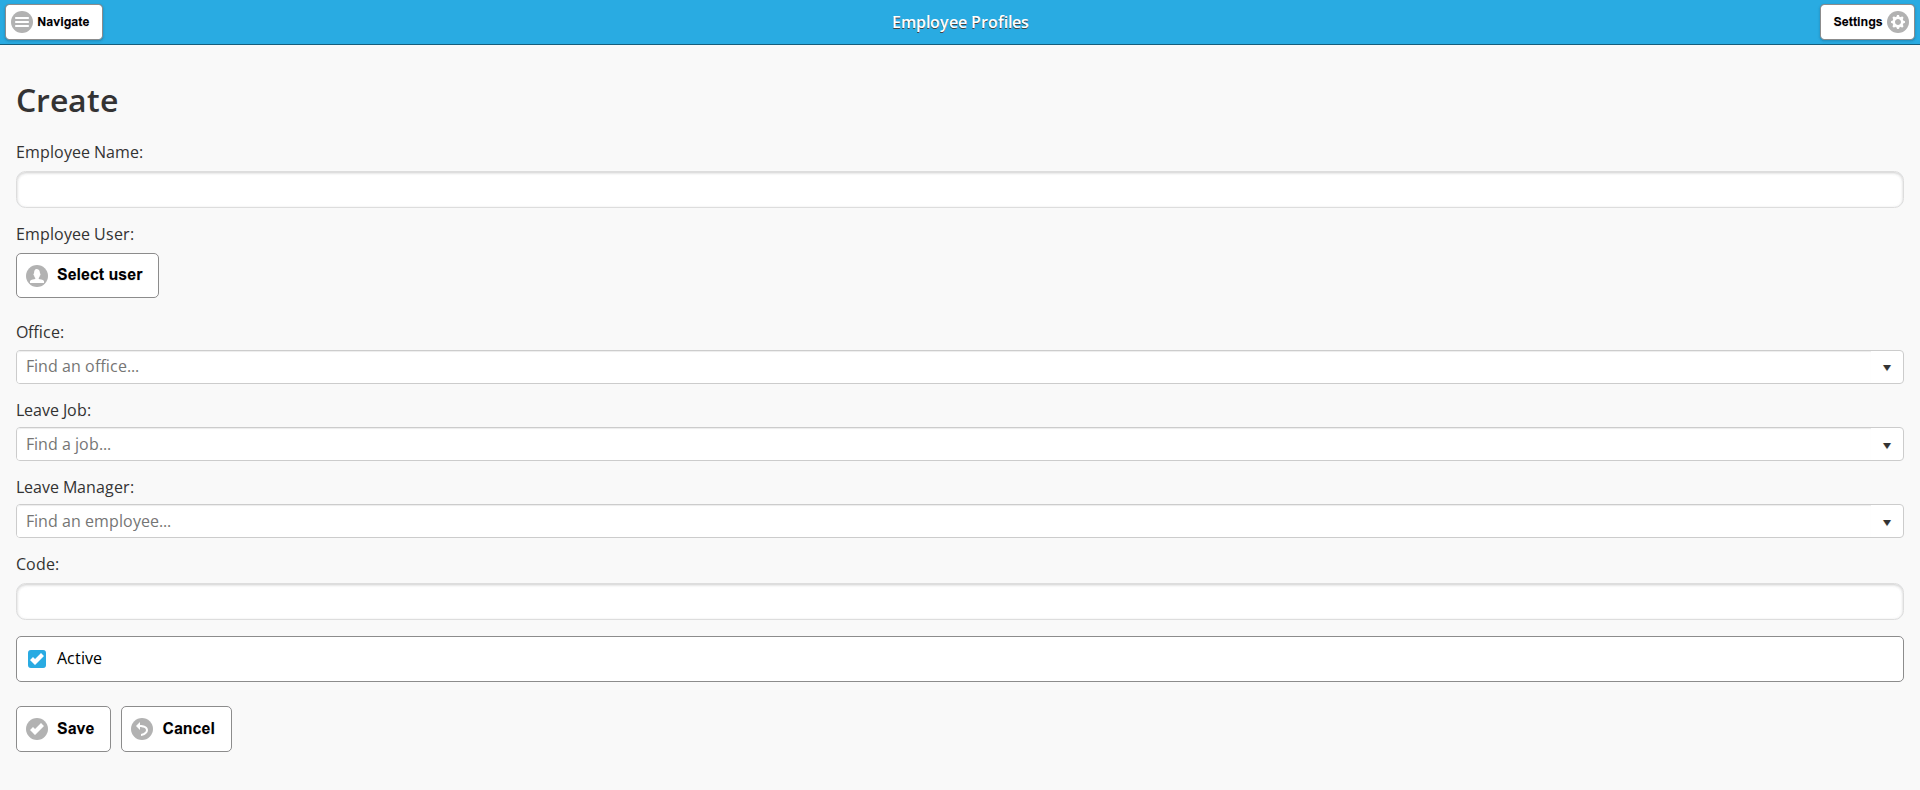
Employee Name: the name everyone will see across the system.
Employee User: a Select user button. Click it and you see all the users you have created; pick the one this employee is. Leave it unset for someone who should not log in.
Office: a “Find an office…” picker. The employee’s office is what the Task Scheduler and the Company Calendar select on when you filter by office.
The next two are used by the Leave Requests module:
- Leave Job: a “Find a job…” picker.
- Leave Manager: a “Find an employee…” picker. See Leave Request Initial Setup.
- Code: the employee code, if your payroll system uses one. It can be left blank.
- Active: enabled by default. While it is ticked the employee can be picked when entering a DWR. Best practice for removing an employee is to untick it rather than deleting, so historical data is preserved.
Click Save to create the profile, or Cancel to leave without saving.
The form an Administrator sees carries no Signature: field. A person’s own signature is set on their own record, from Settings, then Employee Profiles, then the My Profile view, then Edit. See Site Staff Initial Setup.
Last updated