Job Setup
Basic Configuration
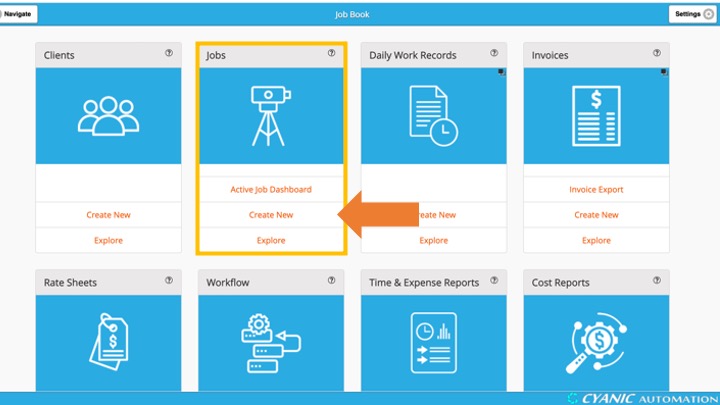
To set up a new job, click Create New in the Jobs card on the dashboard. Only Administrators and Job Coordinators can create jobs.
Assign job #
The job number will count up with each job by default. If you need to use your organization’s numbering scheme, unlock the blue lock beside the Job Number Counter, set the counter value, and lock it again. You can also overwrite the generated job number for individual jobs.
Assign Client
Choose a client from the client drop-down menu. The client list is imported from Clients.

After selecting a client, choose a stored client location or enter a new address. The Client Address is automatically populated from the selected location but can be edited before saving the job.
Project Name
Name of the project which will appear on reports, and will be searchable when selecting a job from DWRs and Invoices.
Status
The status of the project which will show up on the Active Job Dashboard and Job Maps. Update the status frequently so staff can track progress in real time.
Locations
Click Add Location to add as many work sites as you need. These locations appear on invoices and are searchable in Job Maps.
Location Name
A meaningful name to identify the location.
Municipal Address
State/Province
City
Legal Addresses
You can enter any number of legal addresses, and specify any combination of legal address fields.
GPS Coordinates
Enter coordinates manually, or use the Map Display to look up an address and drag the blue pin. The system updates the coordinates automatically when the pin is moved.
Contacts
Click Add Contact to add one or more client contacts to the job. Each contact row includes a dropdown of existing client contacts and an Add to DWR/Invoice checkbox.
You can select NEW CONTACT to enter details for a new person. After saving the job, the contact is also stored on the client for future use.
Add to DWR/Invoice
Check to add this contact to the DWR or Invoice PDF/Word export document.

Project Manager
The employee who is responsible for DWR and Invoice approvals for this job.
Salesperson / Representative

Project Shared Folder
Optional link to a shared drive or cloud folder so staff can access project documents directly from the job.
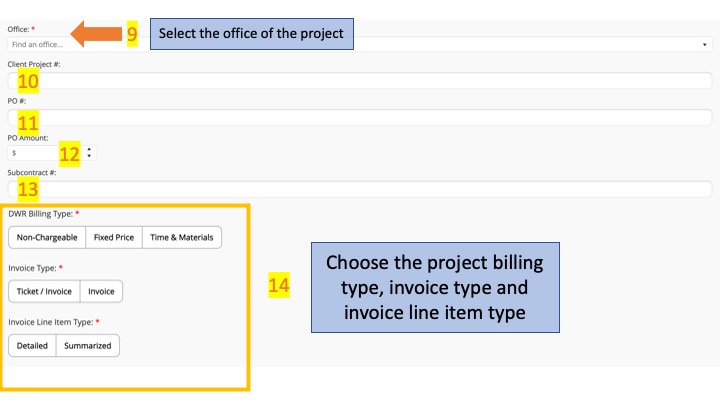
Office
The office which is responsible for the job/project, and can be used for filtering various reports.
Client Project #
The # that your client uses to refer to this job.
PO #
The purchase order number for the job.
PO Amount
The dollar value of the job, which is used in various cost reports.
Subcontract #
Subcontract number for the job, if any.
Billing Configuration
DWR Billing Type
Overhead
This is an internal job which will capture overhead or administration time that is not related to client work.
Non-Chargeable
This job is related to a client, but the DWRs will not be invoiced to the client.
Fixed Price
This job will be invoiced for a set price and does not depend on the hours worked or the equipment used on the job. DWRs will not be invoiced, and an invoice will need to be created manually as described in Invoicing a Fixed Price Job.
Time & Material
This job will be invoiced based on the hours worked and the equipment used on the job. Invoices will be generated based on the DWRs for this job as described in Invoicing a Time & Materials Job.
Invoice Type
Ticket / Invoice
If client requires a ticket before invoicing. A ticket will be created from a set of DWRs, and will then become an invoice after customer approval.
Invoice
Will create an invoice without involving customer ticket approval.
Invoice Line Item Type
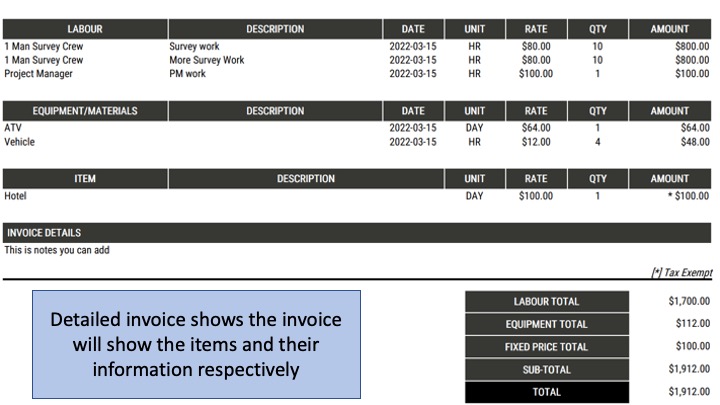
Detailed
Invoices will show each line item billed to the job.
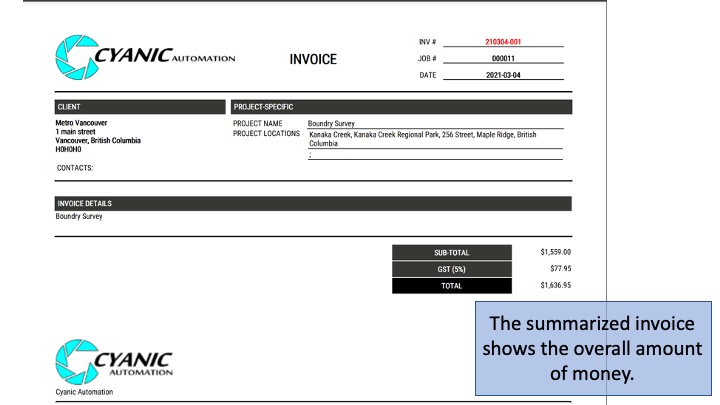
Summarized
Invoices will roll-up the line items based on type, and produce a shorter invoice document.
The following shows the difference between detailed and summarized invoices:
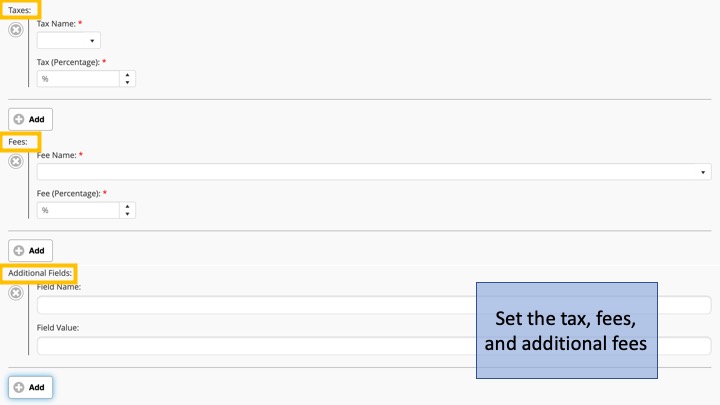
Taxes
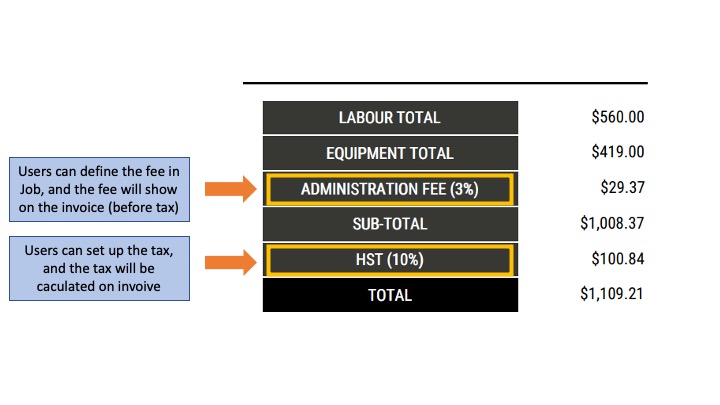
Any number of taxes can be entered, which will added to any invoice for this job.
Fees
Any number of fees can be entered, which will added to any invoice for this job. The fees are calculated as a percentage of the labour, equipment and fixed price totals before taxes.
Additional Fields
Custom fields can be defined which will be added to any invoice for this job.
Adding Line Items
Line Items can be added to a job, which will be available for employees to select on their DWRs. The billable line items include labour costs, equipment & materials, and fixed prices.
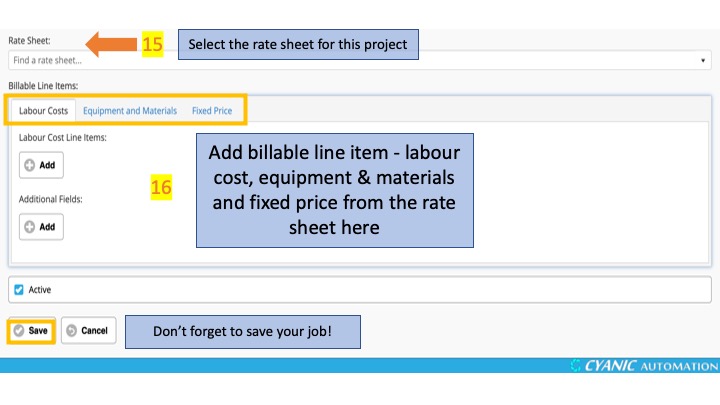
Rate Sheet
If the client has a default rate sheet, it is selected automatically when the job is created. You can switch to another rate sheet at any time before the job is used by DWRs or invoices. To populate line items from the selected rate sheet, click Replace Line Items With Rate Sheet. Note: rate sheets cannot be applied after a job has been referenced by DWRs or invoices.
Labour Costs
Click the ‘Add’ button to add a new Labour Cost, and select from the items imported from Labour Cost Line Items. Any of the fields (Name, Unit, Unit Cost ($), Budget Quantity, Hourly Cost, Tax Exempt) can be customized.
Equipment and Materials
Click the ‘Add’ button to add a new item, and select from the items imported from Equipment and Materials. Any of the fields (Name, Unit, Unit Cost ($), Budget Quantity, Tax Exempt) can be customized.
Fixed Price
Click the ‘Add’ button to add a new item, and select from the items imported from Fixed Price Items. Any of the fields (Name, Unit, Unit Cost ($), Budget Quantity, Tax Exempt) can be customized.
Additional Fields
If you would like users to enter additional information on labour and equipment line items in their DWRs, you can add Additional Fields for that line item.
You can remove line items with the X button, reorder them with the arrows, or replace the default rate with a job-specific value. Use Budget Quantity to capture the estimated hours or quantity for reporting and cost tracking.
Archiving and Removing Line Items
Line Items can be Archived by checking the Archived checkbox. An Archived line item cannot be selected in new DWRs.
Line Items can be removed by clicking the ‘X’ button to the left of the line item. If the line item is already referenced by existing DWRs or Invoices, the line item will instead by Archived.
Users can configure additional administrative information while creating the job, including the GL Code Prefix (used for accounting imports such as Sage), Job Categories, and Job Scope. Jobs can be tagged with multiple categories and scopes for reporting, and the Job Scope Details field lets you record a scope that is not in the predefined list. Set the Order Date and Due Date so they appear on the Active Job Dashboard and scheduling reports.
Moreover, users can set the tax, fees, and additional fields for the job if there are any. Tax (GST, HST, PST) will be added to the invoice. Users can define fees for items such as administration or discounts, and those percentages are calculated before tax. Additional fields support internal references such as work order numbers or cost centers and will appear on the invoice.
Editing and Cloning Jobs
After saving a job, the Jobs Item List opens to the Active tab. Use the Inactive and All tabs to view closed jobs or the entire portfolio.
Click any job to open the job display screen, where you can edit, export to PDF, close, delete, clone, or return to the list. Choose Edit to update any field, including the Job Number, line items, and contacts.
Use Clone to copy a job when you need a similar setup. The system assigns a new Job Number and clears the Status, PO #, and PO Amount so you can enter details specific to the new phase or scope.
Activating and Deactivating Jobs
The Active checkbox at the bottom of the form is checked by default. When a job is Active, it can be selected by users when entering DWRs. When a job is closed out, edit the job and uncheck Active so users can no longer record time. You can reactivate a job later if work resumes. Because referenced data cannot be deleted, best practice is to deactivate jobs instead of deleting them.