

Leave Requests
How to ask for time off in Job Book: finding existing leave requests, filling in a new one with its leave type, dates, description and signature, and how a manager reviews it and approves or rejects it.
Key Concepts
A leave request is the record an employee fills in to ask for time off. It carries the type of leave, the dates, a description and a signature, and it goes to that employee’s manager to be approved or rejected.
- Leave Type is the kind of leave you are asking for. The list your company offers is set up by an Administrator as Labour Cost Items, so it is different at every company. See Leave Request Initial Setup and Administration Settings.
- Leave Job is an internal company job used to track time off, and Leave Manager is the person who approves the request. Both are set on the employee’s profile and are filled in for you on the form. See Users and Employee Profiles.
- LR # is the request number, such as 260905-001. It identifies the request on the list, on the record itself and in the Leave Request Report.
- A request is Not Submitted while it is still a draft. Ticking Submitted sends it to the Leave Manager, and the request then reads Submitted until the manager sets Approval Status to Approved or Rejected. Those four statuses are what the list cards and the report’s Status column show.
Performing Common Tasks
Navigating Existing Leave Requests
On the dashboard, in the Leave Requests card, click Explore.
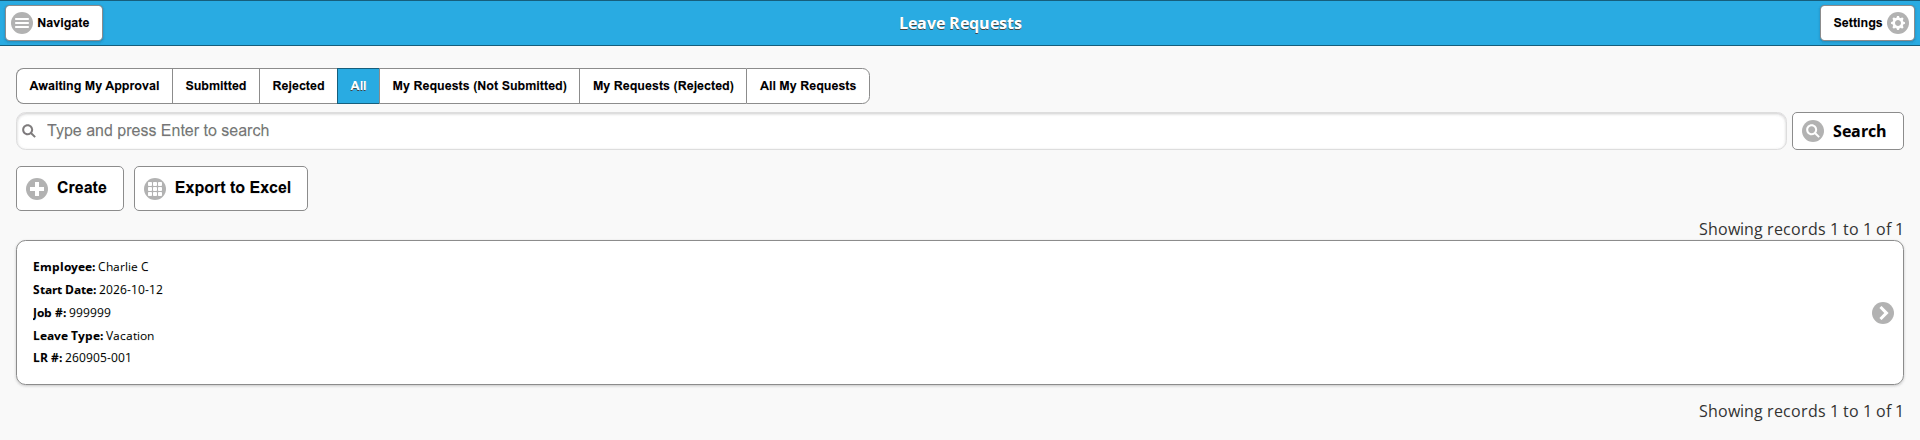
Up to seven saved views sit across the top of the list. The first four are the approver’s views. An Administrator sees all seven, a Manager sees Awaiting My Approval and the three views of their own requests, and a Technician or a Job Coordinator sees only those three:
- Awaiting My Approval: leave requests from your employees that have been submitted but not yet approved or rejected.
- Submitted: all submitted leave requests, from every employee, that have not yet been approved or rejected.
- Rejected: all rejected leave requests from every employee.
- All: every leave request in the system, drafts included.
The last three are your own requests:
- My Requests (Not Submitted): your draft leave requests that have not yet been submitted.
- My Requests (Rejected): your leave requests that have been rejected by your manager. Once a request is rejected, it cannot be edited or resubmitted.
- All My Requests: all of your leave requests.
The rest of the screen is the same on every view:
- A search box reading “Type and press Enter to search”, with a Search button beside it.
- Create and Export to Excel below it. My Requests (Rejected) and All My Requests carry Export to Excel only: there is no Create button on those two views.
- A record count above and below the cards, reading “Showing records 1 to 1 of 1”. A view with nothing in it reads “No records to display” instead.
- One card per request. The approver’s views show Employee:, Start Date:, Job #:, Leave Type: and LR #:. On All My Requests the Employee: line is dropped, because every card is yours, and a Status: line is added.
- A chevron at the right-hand end of a card. Click it to open the request.
Opening a request shows it read-only, on a page titled Display, with Edit, Export to PDF, Delete and Back above and below the record. Employee:, Job: and Leave Manager: are links to those records. An approver also sees the Days off: calendar, Approval Status:, Notes: and a Leave Request History button; the employee who raised the request sees the same record without them.
To withdraw a request you have already submitted, open it and click Delete; there is no separate withdraw step.
Creating a Leave Request
On the dashboard, in the Leave Requests card, click Create New. You can also click Create on the list.
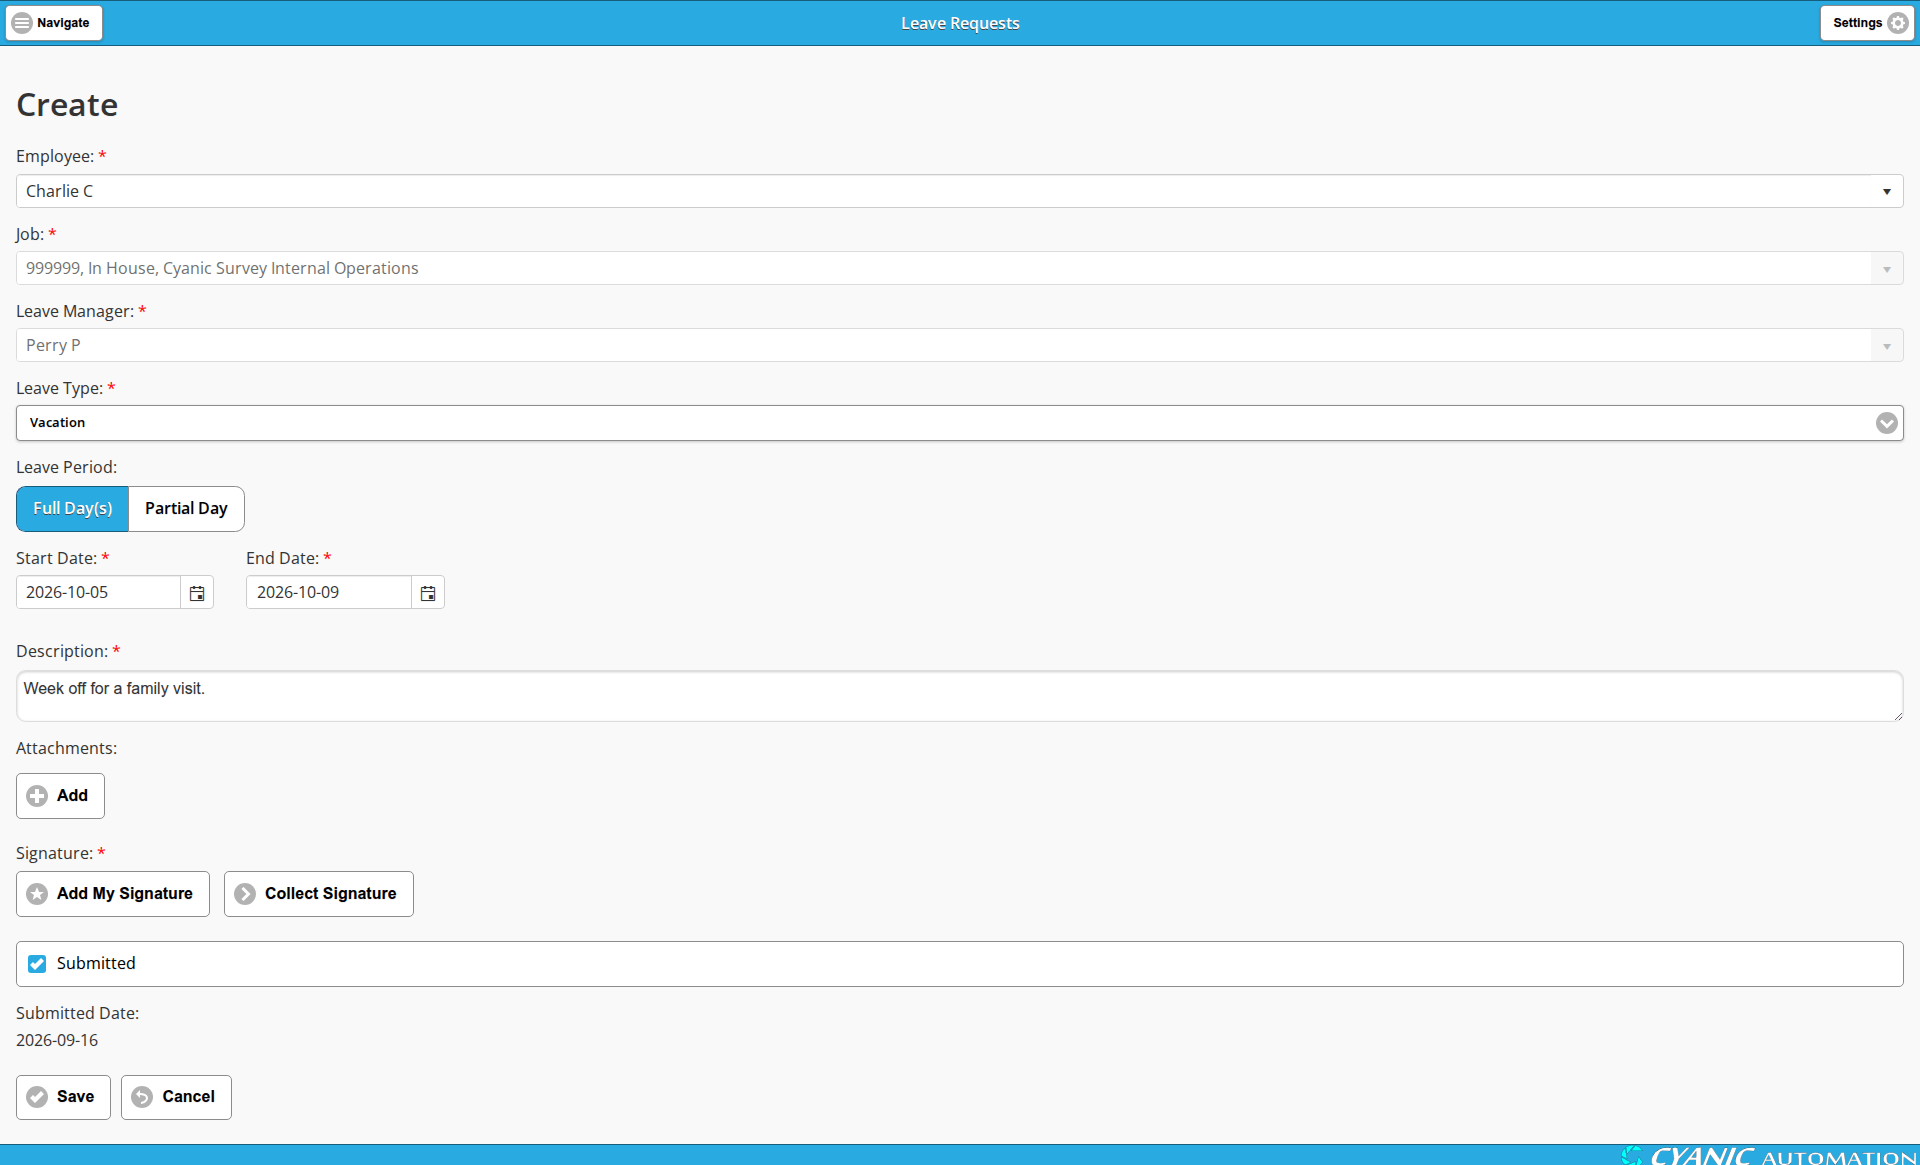
Fill out the following fields. The ones with a red star beside the label are required.
- Employee: opens filled in with you.
- Job: the Leave Job from the employee’s profile. When the profile carries one, the field is filled in for you and greyed out. When it does not, the field is an ordinary picker reading “Find a job…”.
- Leave Manager: the Leave Manager from the employee’s profile, and it behaves the same way: filled in and greyed out when the profile carries one, and a picker reading “Find an employee…” when it does not.
- Leave Type: a dropdown of the leave types your company has set up.
- Leave Period: a pair of buttons, Full Day(s) and Partial Day. Full Day(s) is selected when the form opens.
- Start Date: the date the leave starts.
- End Date: the date the leave ends. Shown with Full Day(s) selected.
- Start Time, End Time and Hours: shown instead of End Date with Partial Day selected. Hours is worked out for you from the two times.
- Description: free text.
- Attachments: click Add to attach files to the request.
- Signature: click Add My Signature to apply the signature saved on your own employee profile, or Collect Signature to draw a new one.
- Submitted: ticked by default. Leave it ticked and saving sends the request to your Leave Manager. Untick it to save the request as a draft and come back to it later.
- Submitted Date: today’s date, filled in for you and not editable.
Once you have filled out the form, click Save. Cancel leaves without saving.
Reviewing a Leave Request
When an employee submits a leave request, their manager will be notified by email and can review it. Managers can reach the requests awaiting their approval in three ways:
- From the email notification link.
- From the Actions required banner on the dashboard, which carries a line reading “1 Leave Request(s) awaiting my approval”. See Acting on “Actions required”.
- By opening the Awaiting My Approval view in the leave request list.
Open the request and click Edit.
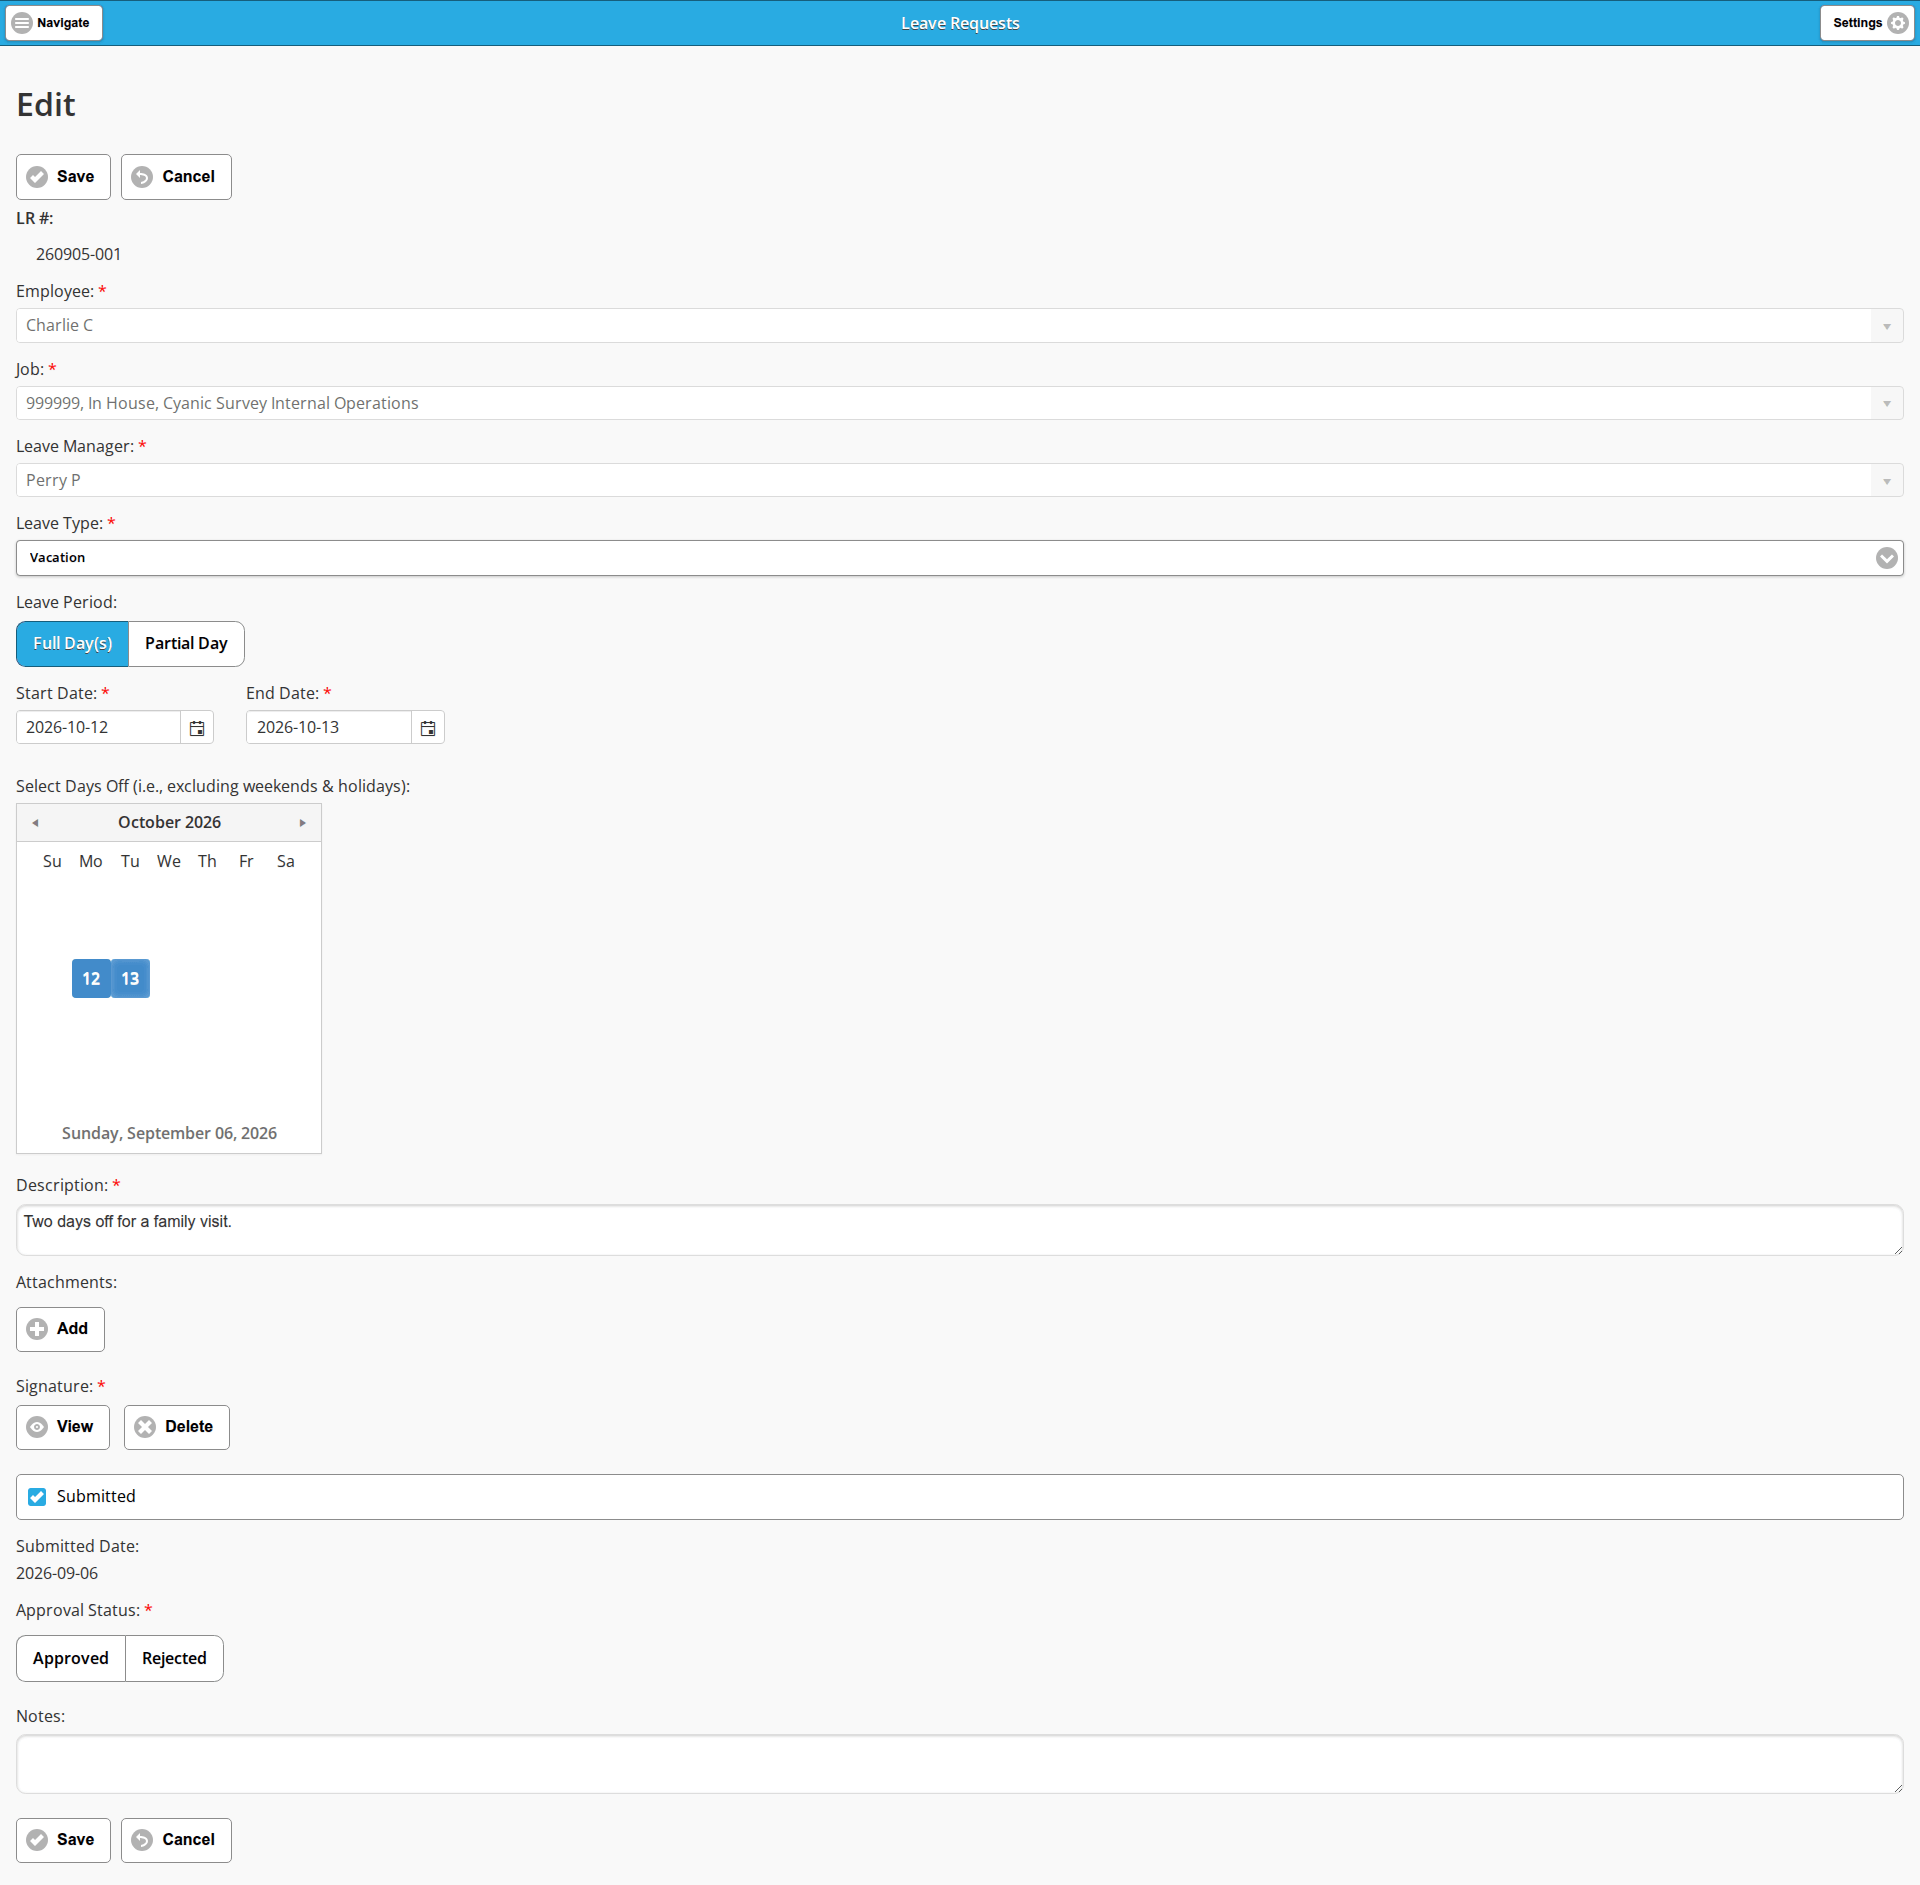
These are the controls an approver works with on the edit view:
- Select Days Off (i.e., excluding weekends & holidays): a month calendar with the days of the request highlighted. It is not on the create form; it appears once the request has been saved, and the read-only Display page labels the same calendar Days off:.
- Approval Status: a pair of buttons, Approved and Rejected. It is not a dropdown; click one of the two.
- Notes: a box for anything you want to tell the employee.
- Signature: View shows the signature already on the request and Delete removes it.
When a request spans several days, weekends are left out of the calendar for you (some sites are configured differently). Holidays are not. Before approving, click each holiday in the Select Days Off (i.e., excluding weekends & holidays): calendar to deselect it.
- To approve a leave request, click Approved under Approval Status and click Save.
- To reject one, click Rejected, add any notes for the employee, and click Save.
- To send one back for changes, untick Submitted and click Save. The employee edits the request and resubmits it.
The employee gets an email whichever you choose.
Approving records the decision and puts the leave on the Company Calendar; it writes no time to the Leave Job. If leave hours are to appear on timesheets, a DWR against the Leave Job is entered by hand.
Last updated